Kerim Koç

Contents
What is Elastic?
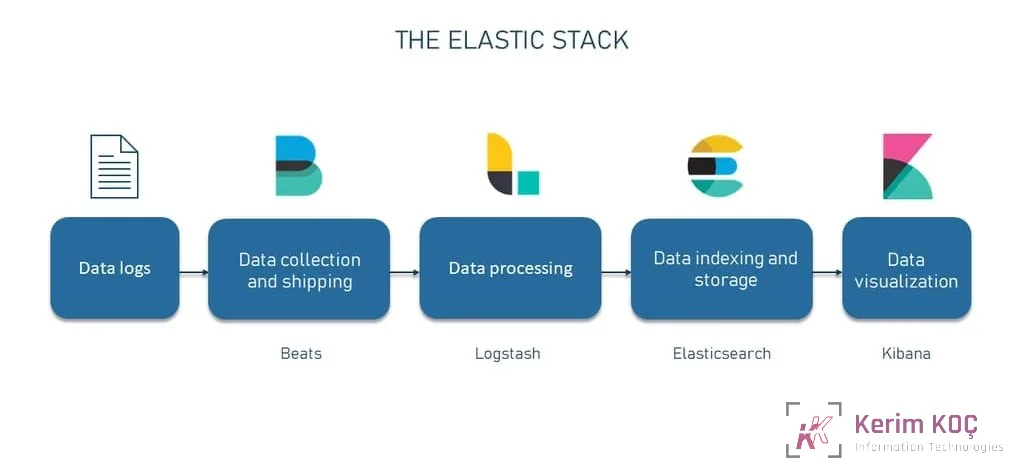
Often referred to as ELK, the Elastic Stack, or Elastic Search /one of its components/, it is a set of three open-source software products: Elasticsearch, Logstash and Kibana. This combination is in fact a very powerful toolset used to collect, process, store, search, analyze and visualize large amounts of data.
- ElasticSearch: Elasticsearch is a search and analytics engine. It is the core component of the ELK Stack that stores and indexes data, making it easy to search, retrieve and analyze.
- Logstash: Logstash is a data processing and ingestion tool. It is responsible for collecting and processing data from various sources, transforming it into a common format and sending it to Elasticsearch for indexing.
- Kibana: Kibana is a data visualization and dashboard tool that works with Elasticsearch. Kibana's user-friendly interface lets users explore and analyze data visually.
- Beats : Beats are lightweight data shippers that collect, forward and process data from various sources. They are designed to collect different types of data and send it to Elasticsearch or Logstash for further processing. Beats are generally used to enhance data collection capabilities.
In this tutorial, we will show you how to install and pair all the stack components. We will use an Ubuntu 22.04 VPS with a sudo user already created.
Installing Elastic Search
The ELK stack components are not available in Ubuntu's apt repositories by default. We will need to manually add Elastic's package source list.
We can do this by running the following command:
curl -fsSL https://artifacts.elastic.co/GPG-KEY-elasticsearch |sudo gpg --dearmor -o /usr/share/keyrings/elastic.gpg
echo "deb [signed-by=/usr/share/keyrings/elastic.gpg] https://artifacts.elastic.co/packages/7.x/apt stable main" | sudo tee -a /etc/apt/sources.list.d/elastic-7.x.list
Update your package list and install Elastic Search.
sudo apt update
sudo apt install elasticsearch
Now we will need to make some changes to the Elastic Search configuration file. This is a YAML file located in /etc/elasticsearch/.
Open the file with the text editor of your choice. In our case, we will use nano.
sudo nano /etc/elasticsearch/elasticsearch.yml💡
YAML is a human-readable data serialization language. It is commonly used for configuration files. YAML syntax relies heavily on indentation, so we need to be careful when modifying the file. Make sure you keep the same indentation format.
Elastic Search listens for traffic from everywhere on port 9220. Leaving it this way can be a serious security issue. We will need to change this in the configuration file. Find the linenetwork.host in the file, uncomment it and update its value to localhost. It should look like this.

Elastic Search will now listen on all interfaces and bound IPs. If you want it to listen on a specific IP / if you have multiple assigned IPs /, you can replace localhost with it.
Now we can start, enable and test Elastic Search by running:
sudo systemctl start elasticsearch
sudo systemctl enable elasticsearch
curl -X GET "localhost:9200"
If your installation is correct, you will get output from curl similar to the following:
{
  "name" : "alpha-vps-elastic",
  "cluster_name" : "elasticsearch",
  "cluster_uuid" : "eIJ2JbTHTSKRw8vJlL6Ewg",
  "version" : {
    "number" : "7.17.12",
    "build_flavor" : "default",
    "build_type" : "deb",
    "build_hash" : "e3b0c3d3c5c130e1dc6d567d6baef1c73eeb2059",
    "build_date" : "2023-07-20T05:33:33.690180787Z",
    "build_snapshot" : false,
    "lucene_version" : "8.11.1",
    "minimum_wire_compatibility_version" : "6.8.0",
    "minimum_index_compatibility_version" : "6.0.0-beta1"
  },
  "tagline" : "You Know, for Search"
}
Installing Kibana
You can install Kibana by running the following command:
sudo apt install kibanaEnable and start it with:
sudo systemctl enable kibana
sudo systemctl start kibana
Setting Up Nginx and Serving Kibana
Kibana is configured to listen only on localhost. To allow access from outside, we need to set up a reverse proxy. For this purpose, we will use Nginx, a very popular web server.
We can install Nginx on our server by running the following command:
sudo apt install nginxWe will need to create a Kibana user that you will use to access the Kibana web interface. We can do this with the openssl CLI tool. You will need to specify your own username.
echo "username-here:`openssl passwd -apr1`" | sudo tee -a /etc/nginx/htpasswd.usersEnter and confirm your secure password.
Create an Nginx server block and specify your domain name:
sudo nano /etc/nginx/sites-available/elastic.kockerim.com
Add the following content to your server block file. Make sure to specify your domain name here as well.
server {
    listen 80;

    server_name elastic.kockerim.com;

    auth_basic "Restricted Access";
    auth_basic_user_file /etc/nginx/htpasswd.users;

    location / {
        proxy_pass http://localhost:5601;
        proxy_http_version 1.1;
        proxy_set_header Upgrade $http_upgrade;
        proxy_set_header Connection 'upgrade';
        proxy_set_header Host $host;
        proxy_cache_bypass $http_upgrade;
    }
}
To enable the new configuration file, run:
sudo ln -s /etc/nginx/sites-available/elastic.kockerim.com /etc/nginx/sites-enabled/elastic.kockerim.comTest your configuration file and reload Nginx.
sudo nginx -t
sudo systemctl reload nginx
If everything is fine, you will get an output saying syntax is ok .💡If you have an active UFW firewall, you will need to allow connections to Nginx. You can do this with the sudo
ufw allow 'Nginx Full' command.
You can now go to Kibana's web GUI in your browser.
Go to http://elastic.kockerim.com or http://ip-address-here💡
You can remove the default Nginx server block file entirely by running the sudo rm /etc/nginx/sites-avalable/default command
and sudo rm /etc/nginx/sites-enabled/default.
Enter your username and password to log in.

Installing Logstash
Logstash is the data processing component of the Elastic Stack. It is a pipeline that processes information and sends it to Elastic Search. It has two required components – input and output. The input receives data from a source, while the output sends the data. A filter is an optional Logstash component that acts as "middleware" between input and output. The filter processes the data.
Install Logstash with the following command:
sudo apt install logstashLogstash's configuration files are located in /etc/logstash/conf.d. We can create a new configuration file for the input
by running the command below:
sudo nano /etc/logstash/conf.d/02-beats-input.confand add the following configuration to it:
input {
  beats {
    port => 5044
  }
}
Now let's create a configuration file for our output component.
sudo nano /etc/logstash/conf.d/30-elasticsearch-output.confoutput {
if [@metadata][pipeline] {
elasticsearch {
hosts => ["localhost:9200"]
manage_template => false
index => "%{[@metadata][beat]}-%{[@metadata][version]}-%{+YYYY.MM.dd}"
pipeline => "%{[@metadata][pipeline]}"
}
} else {
elasticsearch {
hosts => ["localhost:9200"]
manage_template => false
index => "%{[@metadata][beat]}-%{[@metadata][version]}-%{+YYYY.MM.dd}"
}
}
}The output configuration tells Logstash to send Beats data to Elastic Search.
After doing this, you can test your configuration by running the following command:
sudo -u logstash /usr/share/logstash/bin/logstash --path.settings /etc/logstash -tTo start and enable Logstash, run:
sudo systemctl start logstash
sudo systemctl enable logstash
Installing a Beat
Beats are lightweight data shippers that collect data from different sources and ship it directly to Logstash or Elasticsearch.
The Beats platform currently has 6 different data shippers for different types of data:
- Filebeat: Lightweight shipper for logs and other data
- Metricbeat: Lightweight shipper for metrics data
- Packetbeat: Lightweight shipper for network data
- Winlogbeat: Lightweight shipper for Windows event logs
- Auditbeat: Lightweight shipper for audit data
- Heartbeat: Lightweight shipper for uptime monitoring
For this tutorial, we will go with Filebeat, which will send local logs to Logstash. We can install it by running:
sudo apt install filebeat
Let's configure Filebeat to connect to Logstash. We can access the configuration file as follows:
sudo nano /etc/filebeat/filebeat.ymlNotice that this is again a YAML file. Pay attention to the format and indentation.
Filebeat supports multiple outputs at the same time. In our case, we will send our output to Logstash, but by default, Filebeat's configuration includes an output directly to Elastic Search. We will need to disable this by modifying the configuration.
Find the output.elasticsearch line and comment it out as shown in the image below.

To configure the output to Logstash, find the output.logstash lines below and uncomment them:

Save and close the file.
Configuring Filebeat
Filebeat can be extended with Filebeat modules. These modules are a collection of tools for ingesting, storing, searching and visualizing data. They are sets of pre-configured input configurations, parsers and dashboards that make it easy to process different types of log and event data. Each module is tailored to a specific type of data source, such as system logs, application logs, security logs and more.
You can enable Filebeat modules by running the following command:
sudo filebeat modules enable systemYou can list the modules by running the following command:
sudo filebeat modules listYou will get output similar to:
Enabled:
system

Disabled:
activemq
apache
auditd
aws
awsfargate
azure
barracuda
bluecoat
cef
checkpoint
cisco
coredns
crowdstrike
cyberark
cyberarkpas
cylance
elasticsearch
envoyproxy
f5
fortinet
gcp
google_workspace
googlecloud
gsuite
haproxy
ibmmq
icinga
iis
imperva
infoblox
We will use the system module, which collects and parses logs generated by your Ubuntu system.
When you enable a Filebeat module, it automatically configures the necessary inputs, filters and outputs for a specific type of log or event data. It can also include pre-built dashboards in Kibana.
Now we will need to load the ingest pipeline for the system module. We can do this by entering:
sudo filebeat setup --pipelines --modules systemAfter doing this, we will need to load the so-called index template into Elastic Search.💡An index is a collection of documents that share similar data structures and attributes. Each document in an index represents a piece of information, and these documents are stored and indexed to facilitate fast search and analysis.
Index templates are applied automatically when a new index is created.
We can load the template by running:
sudo filebeat setup --index-management -E output.logstash.enabled=false -E 'output.elasticsearch.hosts=["localhost:9200"]'To load the pre-built Kibana dashboards and visualize Filebeat data, we will need to run:
sudo filebeat setup -E output.logstash.enabled=false -E output.elasticsearch.hosts=['localhost:9200'] -E setup.kibana.host=localhost:5601After these configuration steps are complete, we can start and enable Filebeat with the following commands:
sudo systemctl start filebeat
sudo systemctl enable filebeat
Install APM Server:
sudo apt install apm-serverStart APM Server:
sudo systemctl start apm-server
sudo systemctl enable apm-server
Configuring APM Server
You need to configure APM Server to communicate with Elasticsearch.
Editing the APM Server Configuration File:
Open the configuration file:
sudo nano /etc/apm-server/apm-server.ymlSet up the Elasticsearch connection: Find the output.elasticsearch section and add Elasticsearch's URL and authentication details:
output.elasticsearch:
  hosts: ["http://localhost:9200"]
  username: "elastic"  # Elasticsearch username
  password: "your_password"  # Elasticsearch password
Kibana integration (optional): To enable integration with Kibana, make the following settings:
setup.kibana:
  host: "http://localhost:5601"
Save changes and exit: Save the changes and exit the file with Ctrl+O and then Ctrl+X.
Restart APM Server:
sudo systemctl restart apm-serverAll of our ELK stack components are now successfully installed and configured.