 Kerim Koç
Contents
- Introduction
- Prerequisites
- Installing the Default JRE/JDK
- Installing Oracle JDK 11
- Step 1 – Installing Nginx
- Step 2 – Adjusting the Firewall
- Step 1 – Installing and Configuring Elasticsearch
- Step 2 – Installing and Configuring the Kibana Dashboard
- Step 3 – Installing and Configuring Logstash
- Step 4 – Installing and Configuring Filebeat
- Step 5 – Exploring Kibana Dashboards
- Conclusion
Introduction
The Elastic Stack, formerly known as the ELK Stack , is a collection of open-source software produced by Elastic that allows you to search, analyze and visualize logs generated from any source in any format, a practice known as centralized logging . Centralized logging can be very useful when attempting to identify problems with your servers or applications, as it allows you to search all of your logs in a single place. It is also useful because it lets you identify issues that span multiple servers by correlating their logs over a specific time frame.
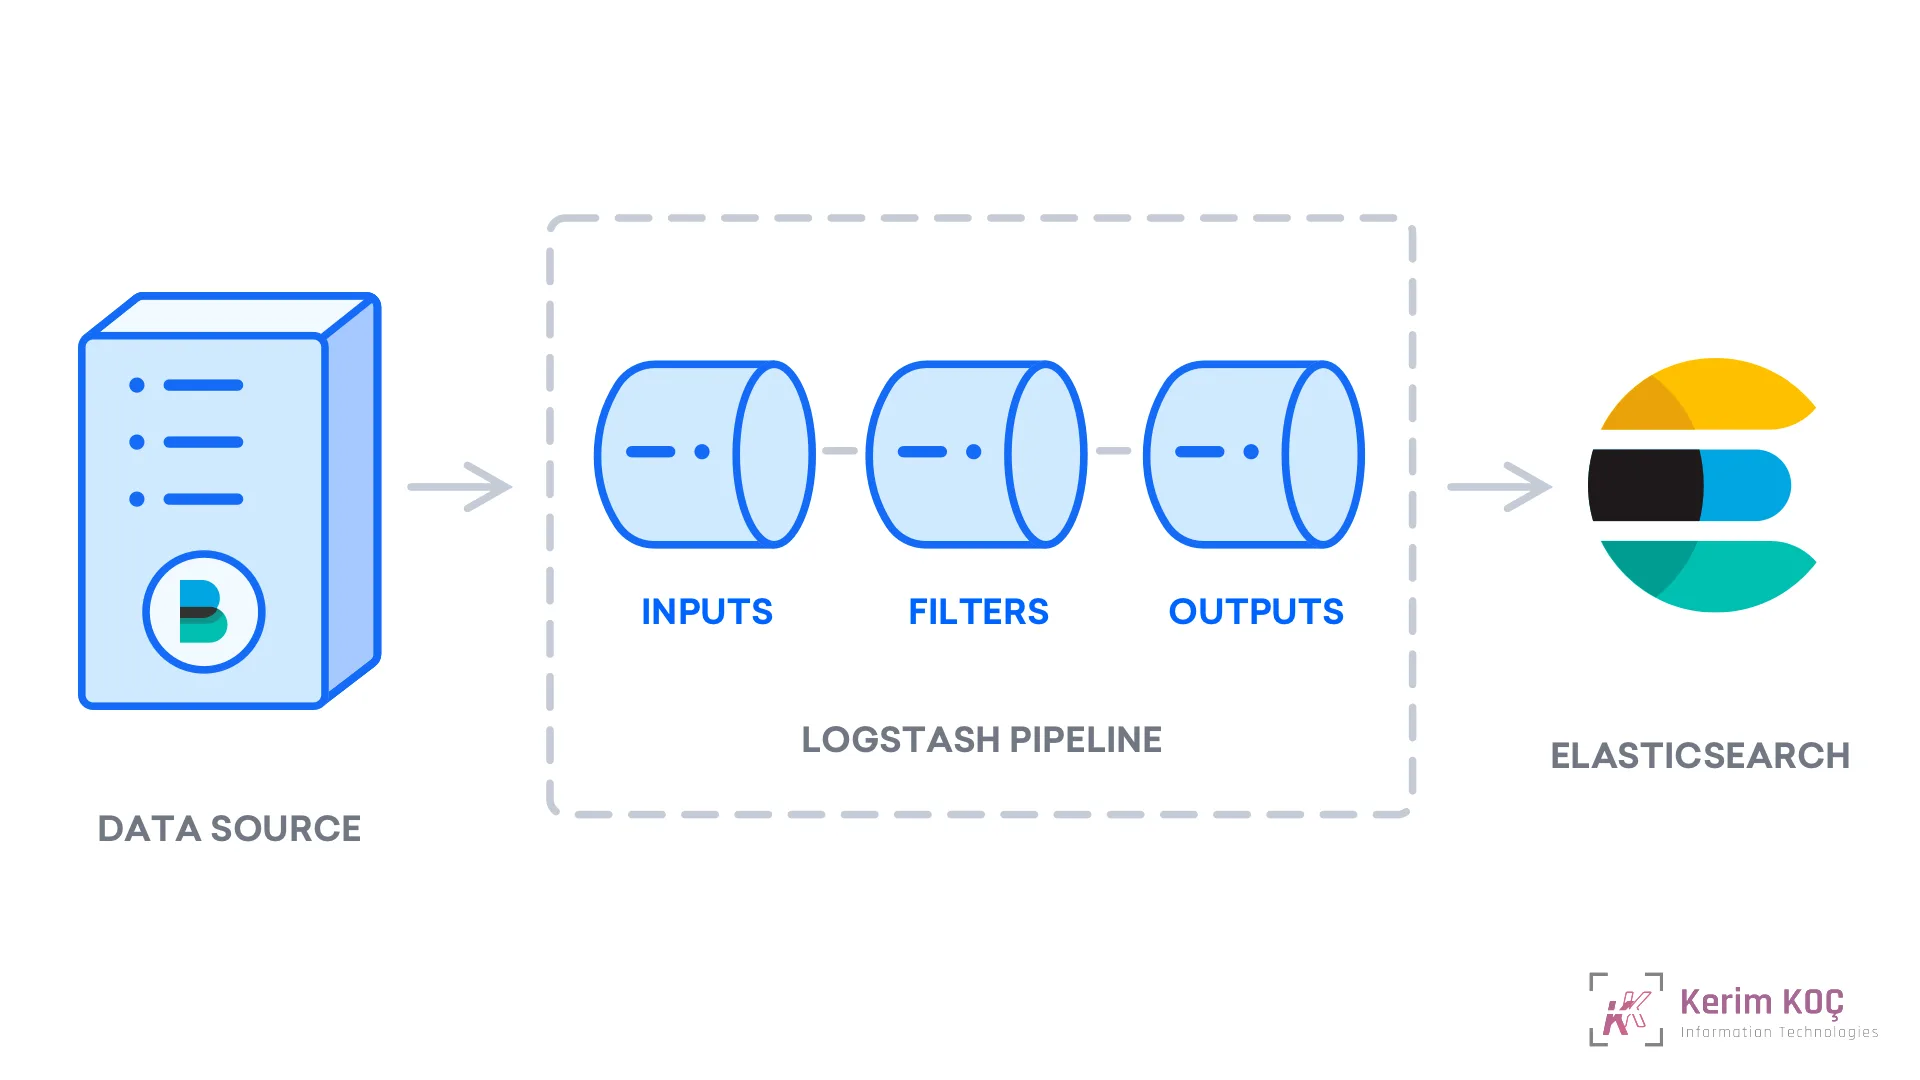
The Elastic Stack has four main components:
- Elasticsearch : a distributed RESTful search engine that stores all of the collected data.
- Logstash : the data processing component of the Elastic Stack that sends incoming data to Elasticsearch.
- Kibana : a web interface for searching and visualizing logs.
- Beats : lightweight, single-purpose data shippers that can send data from hundreds or thousands of machines to Logstash or Elasticsearch.
In this tutorial you will install the Elastic Stack on an Ubuntu 18.04 server. You will learn how to install all of the components of the Elastic Stack, including Filebeat, a Beat used for forwarding and centralizing logs and files, and how to configure them to collect and visualize system logs. In addition, because Kibana is normally only available on localhost, we will use Nginx to proxy it so that it is accessible through a web browser. We will install all of these components on a single server, which we will refer to as our Elastic Stack server .
Note : When installing the Elastic Stack, you must use the same version across the entire stack. In this tutorial we will install the latest versions of the entire stack, which at the time of writing are Elasticsearch 7.6.1, Kibana 7.6.1, Logstash 7.6.1 and Filebeat 7.6.1.
Prerequisites
To complete this tutorial, you will need the following:
- An Ubuntu 18.04 server with a non-root user with sudo privileges and a firewall configured with
ufw. The amount of CPU, RAM and storage that your Elastic Stack server will need depends on the volume of logs you intend to collect. In this tutorial, we will use a VPS with the following specifications for our Elastic Stack server:- Operating System: Ubuntu 18.04
- RAM: 4 GB
- CPU: 2
- Java 8, which is required by Elasticsearch and Logstash, installed on your server. Note that Java 9 is not supported.
- Nginx installed on your server, which we will configure later in this guide as a reverse proxy for Kibana.
- A fully qualified domain name (FQDN). This tutorial will use
example.comthroughout. You can purchase a domain name on Namecheap, get one for free on Freenom, or use the domain registrar of your choice. - Both of the following DNS records set up for your server.
- An A record for
example.compointing to your server's public IP address. - An A record for
www.example.compointing to your server's public IP address.
- An A record for
Installing the Default JRE/JDK
The easiest option for installing Java is to use the version packaged with Ubuntu. By default, Ubuntu 18.04 includes OpenJDK version 11, an open-source variant of the JRE and JDK.
To install this version, first update the package index:
sudo apt updateNext, check whether Java is already installed:
java -versionIf Java is not currently installed, you will see the following output:
Output
Command 'java' not found, but can be installed with:

apt install default-jre
apt install openjdk-11-jre-headless
apt install openjdk-8-jre-headless
Execute the following command to install the default Java Runtime Environment (JRE), which will install the JRE from OpenJDK 11:
sudo apt install default-jre
The JRE will allow you to run almost all Java software.
Verify the installation with:
java -versionYou will see the following output:
Output
openjdk version "11.0.7" 2020-04-14
OpenJDK Runtime Environment (build 11.0.7+10-post-Ubuntu-2ubuntu218.04)
OpenJDK 64-Bit Server VM (build 11.0.7+10-post-Ubuntu-2ubuntu218.04, mixed mode, sharing)
In addition to the JRE, you may need the Java Development Kit (JDK) to compile and run some specific Java-based software. To install the JDK, execute the following command, which will also install the JRE:
sudo apt install default-jdk Verify that the JDK is installed by checking the version of javac, the Java compiler:
javac -versionYou will see the following output:
Output
javac 11.0.7
Now let's look at how to install Oracle's official JDK and JRE.
Installing Oracle JDK 11
Oracle's license agreement for Java does not allow automatic installation through package managers. To install Oracle JDK, the official version distributed by Oracle, you must create an Oracle account and manually download the JDK for the version you want to use, in order to add a new package repository. You can then install it with the help of a third-party installer script together with apt .
The version of Oracle JDK you need to download must match the version of the installer script. To find out which version you need, visit the oracle-java11-installer page.
Find the Bionic package, as shown in the following figure:
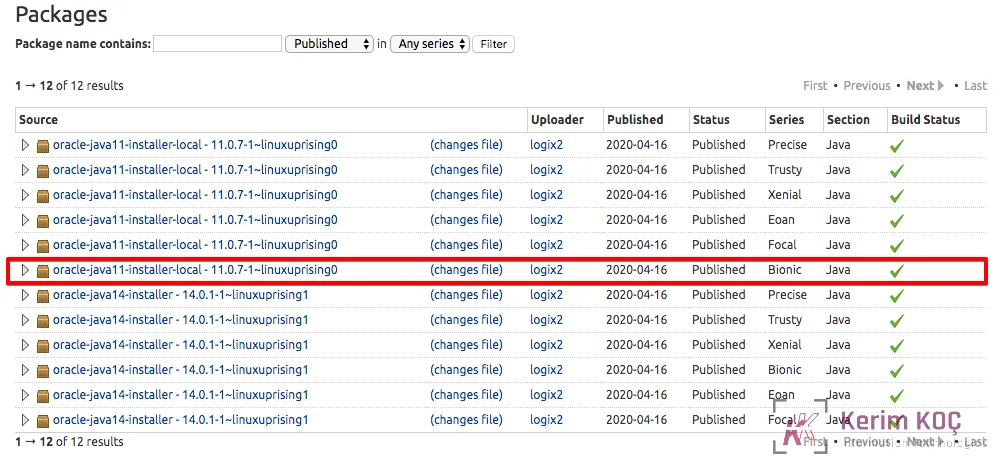
In this image, the script version is 11.0.7. In this case you will need Oracle JDK 11.0.7. You do not need to download anything from this page; you will shortly download the installer script with apt.
Next, visit the Downloads page and find the version that matches what you need.

Click the Download JDK button and you will be taken to a screen that shows the versions that are available. Click the .tar.gz Linux package.
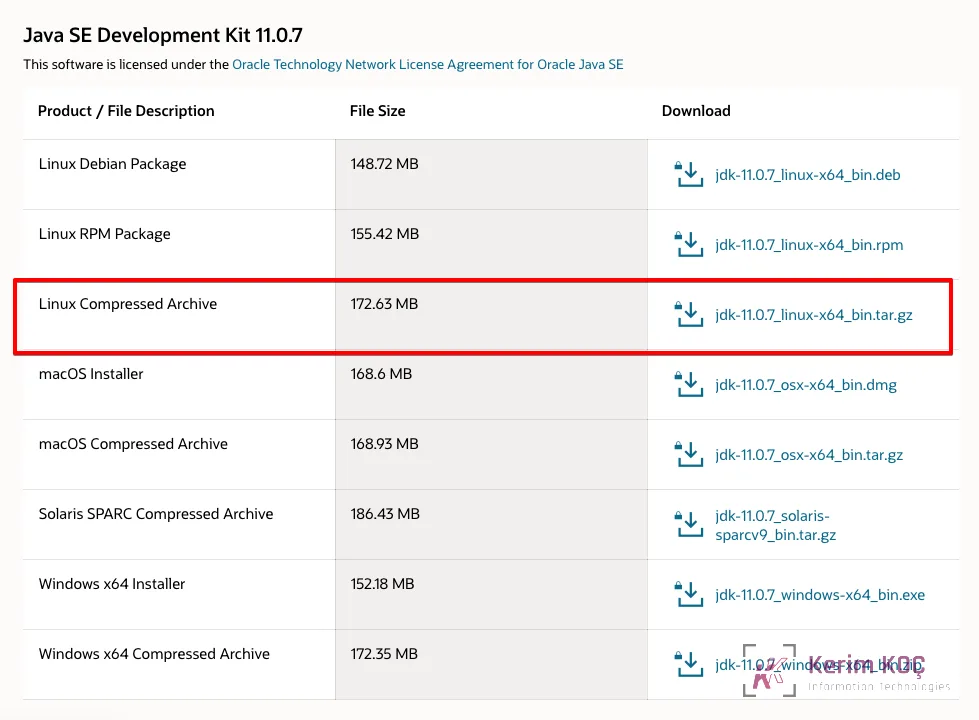
Package link: https://download.oracle.com/otn/java/jdk/11.0.10%2B8/020c4a6d33b74f6a9d2bc6fbf189da81/jdk-11.0.10_linux-x64_bin.tar.gz
You will be presented with a screen asking you to accept the Oracle license agreement. Select the checkbox to accept the license agreement and press the Download button. Your download will begin. You may need to log in to your Oracle account once more before the download starts.
Once the file is downloaded, you need to transfer it to your server. On your local machine, upload the file to your server. On Linux, macOS, or Windows using the Windows Subsystem for Linux, use the scp command to transfer the file to the home directory of the users user. The following command assumes that you saved the Oracle JDK file to the Downloads folder of your local machine:
scp Downloads/jdk-11.0.7_linux-x64_bin.tar.gz users@your_server_ip:~When the file upload is complete, return to your server and add the third-party repository that will help you install Oracle's Java.
Install the software-properties-common package, which adds the add-apt-repository command to your system:
sudo apt install software-properties-commonNext, import the signing key that is used to verify the software you are about to install:
sudo apt-key adv --keyserver keyserver.ubuntu.com --recv-keys EA8CACC073C3DB2AYou will see this output:
Output
gpg: key EA8CACC073C3DB2A: public key "Launchpad PPA for Linux Uprising" imported
gpg: Total number processed: 1
gpg:               imported: 1
Next, use the add-apt-repository command to add the repository to your list of package sources:
sudo add-apt-repository ppa:linuxuprising/javaYou will see this message:
Output
 Oracle Java 11 (LTS) and 12 installer for Ubuntu, Linux Mint and Debian.

Java binaries are not hosted in this PPA due to licensing. The packages in this PPA download and install Oracle Java 11, so a working Internet connection is required.

The packages in this PPA are based on the WebUpd8 Oracle Java PPA packages: https://launchpad.net/~webupd8team/+archive/ubuntu/java

Created for users of https://www.linuxuprising.com/

Installation instructions (with some tips), feedback, suggestions, bug reports etc.:

. . .

Press [ENTER] to continue or ctrl-c to cancel adding it
Press the ENTER key to continue with the installation. You may see a message about no valid OpenPGP data found, but you can safely ignore it.
Update your package list to prepare the new software for installation:
sudo apt update The installer will look for the Oracle JDK that you downloaded in /var/cache/oracle-jdk11-installer-local. Create this directory and move the Oracle JDK archive there:
sudo mkdir -p /var/cache/oracle-jdk11-installer-local/
sudo cp jdk-11.0.7_linux-x64_bin.tar.gz /var/cache/oracle-jdk11-installer-local/
Finally, install the package:
sudo apt install oracle-java11-installer-localThe installer will first ask you to accept the Oracle license agreement. Accept the agreement, and the installer will then extract and install the Java package.
Step 1 – Installing Nginx
Because Nginx is available in Ubuntu's default repositories, it is possible to install it from these repositories using the apt packaging system.
Since this is our first interaction with the apt packaging system in this session, we will update our local package index so that we have access to the latest package listings. Afterwards, we can install nginx:
sudo apt update
sudo apt install nginx
After you accept the procedure, apt will install Nginx and any required dependencies on your server.
Step 2 – Adjusting the Firewall
Before we test Nginx, the firewall software needs to be adjusted to allow access to the service. Nginx registers itself as a service with ufw upon installation, making it straightforward to allow Nginx access.
List the application configurations that ufw knows how to work with by typing:
sudo ufw app listYou should get a listing of the application profiles:
Output
Available applications:
  Nginx Full
  Nginx HTTP
  Nginx HTTPS
  OpenSSH
As you can see, there are three profiles available for Nginx:
- Nginx Full : This profile opens both port 80 (normal, unencrypted web traffic) and port 443 (TLS/SSL encrypted traffic)
- Nginx HTTP : This profile opens only port 80 (normal, unencrypted web traffic)
- Nginx HTTPS : This profile opens only port 443 (TLS/SSL encrypted traffic)
It is recommended that you enable the most restrictive profile that will still allow the traffic you have configured. Since we have not yet configured SSL for our server in this guide, we will only need to allow traffic on port 80.
You can enable this by typing:
sudo ufw allow 'Nginx HTTP'You can verify the change by typing:
sudo ufw status
You should see HTTP traffic allowed in the displayed output:
Output
Status: active

To                         Action      From
--                         ------      ----
OpenSSH                    ALLOW       Anywhere
Nginx HTTP                 ALLOW       Anywhere
OpenSSH (v6)               ALLOW       Anywhere (v6)
Nginx HTTP (v6)            ALLOW       Anywhere (v6)
Step 1 – Installing and Configuring Elasticsearch
The Elastic Stack components are not available in Ubuntu's default package repositories. However, they can be installed with APT after adding Elastic's package source list.
All of the packages of the Elastic Stack are signed with the Elasticsearch signing key in order to protect your system from package spoofing. Packages that are authenticated using the key will be considered trusted by your package manager. In this step, you will import the Elasticsearch public GPG key and add the Elastic package source list in order to install Elasticsearch.
To begin, run the following command to import the Elasticsearch public GPG key into APT:
wget -qO - https://artifacts.elastic.co/GPG-KEY-elasticsearch | sudo apt-key add -
Next, add the Elastic source list to the sources.list.d directory, where APT will look for new sources:
echo "deb https://artifacts.elastic.co/packages/7.x/apt stable main" | sudo tee -a /etc/apt/sources.list.d/elastic-7.x.list
Next, update your package lists so that APT will read the new Elastic source:
sudo apt update
Then install Elasticsearch with this command:
sudo apt install elasticsearch
When the Elasticsearch installation is finished, use your preferred text editor to edit Elasticsearch's main configuration file, elasticsearch.yml. Here we will use nano:
sudo nano /etc/elasticsearch/elasticsearch.yml
Note: Elasticsearch's configuration file is in YAML format, which means that indentation is very important! Be sure that you do not add any extra spaces as you edit this file.
Elasticsearch listens for traffic from everywhere on port 9200. You will want to restrict outside access to your Elasticsearch instance to prevent outsiders from reading your data or shutting down your Elasticsearch cluster through the REST API. Find the line that specifies network.host, uncomment it, and replace its value with localhost so that it looks like this: /etc/elasticsearch/elasticsearch.yml
. . .
network.host: localhost
. . .
Save and close elasticsearch.yml by pressing CTRL+X, then Y, and then ENTER if you are using nano. Then, start the Elasticsearch service with systemctl:
sudo systemctl start elasticsearch
Next, run the following command to enable Elasticsearch to start up every time your server boots:
sudo systemctl enable elasticsearch
You can test whether your Elasticsearch service is running by sending an HTTP request:
curl -X GET "localhost:9200"
You will see a response showing some basic information about your local node, similar to this:
Output
{
  "name" : "ElasticSearch",
  "cluster_name" : "elasticsearch",
  "cluster_uuid" : "SMYhVWRiTwS1dF0pQ-h7SQ",
  "version" : {
    "number" : "7.6.1",
    "build_flavor" : "default",
    "build_type" : "deb",
    "build_hash" : "aa751e09be0a5072e8570670309b1f12348f023b",
    "build_date" : "2020-02-29T00:15:25.529771Z",
    "build_snapshot" : false,
    "lucene_version" : "8.4.0",
    "minimum_wire_compatibility_version" : "6.8.0",
    "minimum_index_compatibility_version" : "6.0.0-beta1"
  },
  "tagline" : "You Know, for Search"
}
Now that Elasticsearch is up and running, let's install Kibana, the next component of the Elastic Stack.
Step 2 – Installing and Configuring the Kibana Dashboard
According to the official documentation, you should install Kibana only after installing Elasticsearch. Installing in this order ensures that the components each product depends on are correctly in place.
Because you already added the Elastic package source in the previous step, you can install the remaining components of the Elastic Stack using apt:
sudo apt install kibanaThen enable and start the Kibana service:
sudo systemctl enable kibana
sudo systemctl start kibana
Because Kibana is configured to only listen on localhost, we must set up a reverse proxy to allow external access to it. We will use Nginx for this purpose, which should already be installed on your server.
First, use the openssl command to create an administrative Kibana user that you will use to access the Kibana web interface. As an example we will name this account kibanaadmin, but to ensure greater security we recommend that you choose a non-standard name for your user that would be difficult to guess.
The following command will create the administrative Kibana user and password, and store them in the htpasswd.users file. You will configure Nginx to require this username and password and read this file momentarily:
echo "kibanaadmin:`openssl passwd -apr1`" | sudo tee -a /etc/nginx/htpasswd.users
Enter and confirm a password at the prompt. Remember or take note of this login, as you will need it to access the Kibana web interface.
Next, we will create an Nginx server block file. As an example we will refer to this file as example.com, although you may find it helpful to give yours a more descriptive name. For instance, if you have an FQDN and DNS records set up for this server, you could name this file after your FQDN:
sudo nano /etc/nginx/sites-available/example.com
Add the following code block into the file, being sure to update example.com to match your server's FQDN or public IP address. This code configures Nginx to direct your server's HTTP traffic to the Kibana application, which is listening on localhost:5601. Additionally, it configures Nginx to read the htpasswd.users file and require basic authentication.
If you have a file with existing content, delete all of it before adding the following: /etc/nginx/sites-available/example.com
server {
    listen 80;

    server_name example.com;

    auth_basic "Restricted Access";
    auth_basic_user_file /etc/nginx/htpasswd.users;

    location / {
        proxy_pass http://localhost:5601;
        proxy_http_version 1.1;
        proxy_set_header Upgrade $http_upgrade;
        proxy_set_header Connection 'upgrade';
        proxy_set_header Host $host;
        proxy_cache_bypass $http_upgrade;
    }
}
Save and close the file when you are finished.
Next, enable the new configuration by creating a symbolic link to the sites-enabled directory. If you already created a server block file with the same name in the Nginx prerequisite, you do not need to run this command:
sudo ln -s /etc/nginx/sites-available/example.com /etc/nginx/sites-enabled/example.com
Then check the configuration for syntax errors:
sudo nginx -t
If any errors are reported in your output, go back and double-check that the content you placed in your configuration file was added correctly. Once you see syntax is ok in the output, go ahead and restart the Nginx service:
sudo systemctl restart nginx
If you followed the initial server setup guide, you should have a UFW firewall enabled. To allow connections to Nginx, we can adjust the rules by typing:
sudo ufw allow 'Nginx Full'
Kibana is now accessible via your FQDN or the public IP address of your Elastic Stack server. You can check the Kibana server's status page by navigating to the following address and entering your login credentials when prompted:
http://your_server_ip/statusThis status page displays information about the server's resource usage and lists the installed plugins.
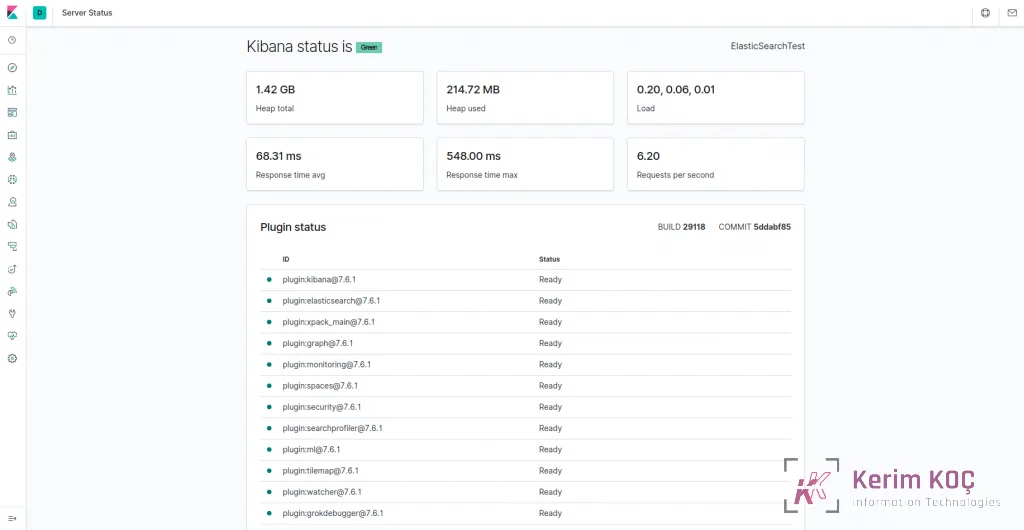
Note : As mentioned in the Prerequisites section, it is recommended that you enable SSL/TLS on your server.
Now that the Kibana dashboard is configured, let's install the next component: Logstash.
Step 3 – Installing and Configuring Logstash
Although it is possible for Beats to send data directly to the Elasticsearch database, we recommend using Logstash to process the data. This allows you to collect data from different sources, transform it into a common format, and export it to another database.
Install Logstash with this command:
sudo apt install logstash
After installing Logstash, you can move on to configuring it. Logstash's configuration files are written in JSON format and reside in the /etc/logstash/conf.d directory. As you configure it, it is helpful to think of Logstash as a pipeline that takes in data at one end, processes it in some way, and sends it out to its destination (in this case, the destination being Elasticsearch). A Logstash pipeline has two required elements, input and output, and one optional element, filter. Input plugins consume data from a source, filter plugins process the data, and output plugins write the data to a destination.

Create a configuration file called 02-beats-input.conf where you will set up your Filebeat input:
sudo nano /etc/logstash/conf.d/02-beats-input.conf
Insert the following input configuration. This specifies a beats input that will listen on TCP port 5044./etc/logstash/conf.d/02-beats-input.conf /etc/logstash/conf.d/02-beats-input.conf
input {
  beats {
    port => 5044
  }
}
Save and close the file. Next, we will create a configuration file called 10-syslog-filter.conf, where we will add a filter for system logs, also known as syslogs :
sudo nano /etc/logstash/conf.d/10-syslog-filter.confAdd the following system log filter configuration. This example syslog configuration was taken from the official Elastic documentation . This filter is used to parse incoming system logs so that they are structured and usable by the predefined Kibana dashboards: /etc/logstash/conf.d/10-syslog-filter.conf
filter {
  if [fileset][module] == "system" {
    if [fileset][name] == "auth" {
      grok {
        match => { "message" => ["%{SYSLOGTIMESTAMP:[system][auth][timestamp]} %{SYSLOGHOST:[system][auth][hostname]} sshd(?:\[%{POSINT:[system][auth][pid]}\])?: %{DATA:[system][auth][ssh][event]} %{DATA:[system][auth][ssh][method]} for (invalid user )?%{DATA:[system][auth][user]} from %{IPORHOST:[system][auth][ssh][ip]} port %{NUMBER:[system][auth][ssh][port]} ssh2(: %{GREEDYDATA:[system][auth][ssh][signature]})?",
                  "%{SYSLOGTIMESTAMP:[system][auth][timestamp]} %{SYSLOGHOST:[system][auth][hostname]} sshd(?:\[%{POSINT:[system][auth][pid]}\])?: %{DATA:[system][auth][ssh][event]} user %{DATA:[system][auth][user]} from %{IPORHOST:[system][auth][ssh][ip]}",
                  "%{SYSLOGTIMESTAMP:[system][auth][timestamp]} %{SYSLOGHOST:[system][auth][hostname]} sshd(?:\[%{POSINT:[system][auth][pid]}\])?: Did not receive identification string from %{IPORHOST:[system][auth][ssh][dropped_ip]}",
                  "%{SYSLOGTIMESTAMP:[system][auth][timestamp]} %{SYSLOGHOST:[system][auth][hostname]} sudo(?:\[%{POSINT:[system][auth][pid]}\])?: \s*%{DATA:[system][auth][user]} :( %{DATA:[system][auth][sudo][error]} ;)? TTY=%{DATA:[system][auth][sudo][tty]} ; PWD=%{DATA:[system][auth][sudo][pwd]} ; USER=%{DATA:[system][auth][sudo][user]} ; COMMAND=%{GREEDYDATA:[system][auth][sudo][command]}",
                  "%{SYSLOGTIMESTAMP:[system][auth][timestamp]} %{SYSLOGHOST:[system][auth][hostname]} groupadd(?:\[%{POSINT:[system][auth][pid]}\])?: new group: name=%{DATA:system.auth.groupadd.name}, GID=%{NUMBER:system.auth.groupadd.gid}",
                  "%{SYSLOGTIMESTAMP:[system][auth][timestamp]} %{SYSLOGHOST:[system][auth][hostname]} useradd(?:\[%{POSINT:[system][auth][pid]}\])?: new user: name=%{DATA:[system][auth][user][add][name]}, UID=%{NUMBER:[system][auth][user][add][uid]}, GID=%{NUMBER:[system][auth][user][add][gid]}, home=%{DATA:[system][auth][user][add][home]}, shell=%{DATA:[system][auth][user][add][shell]}$",
                  "%{SYSLOGTIMESTAMP:[system][auth][timestamp]} %{SYSLOGHOST:[system][auth][hostname]} %{DATA:[system][auth][program]}(?:\[%{POSINT:[system][auth][pid]}\])?: %{GREEDYMULTILINE:[system][auth][message]}"] }
        pattern_definitions => {
          "GREEDYMULTILINE"=> "(.|\n)*"
        }
        remove_field => "message"
      }
      date {
        match => [ "[system][auth][timestamp]", "MMM  d HH:mm:ss", "MMM dd HH:mm:ss" ]
      }
      geoip {
        source => "[system][auth][ssh][ip]"
        target => "[system][auth][ssh][geoip]"
      }
    }
    else if [fileset][name] == "syslog" {
      grok {
        match => { "message" => ["%{SYSLOGTIMESTAMP:[system][syslog][timestamp]} %{SYSLOGHOST:[system][syslog][hostname]} %{DATA:[system][syslog][program]}(?:\[%{POSINT:[system][syslog][pid]}\])?: %{GREEDYMULTILINE:[system][syslog][message]}"] }
        pattern_definitions => { "GREEDYMULTILINE" => "(.|\n)*" }
        remove_field => "message"
      }
      date {
        match => [ "[system][syslog][timestamp]", "MMM  d HH:mm:ss", "MMM dd HH:mm:ss" ]
      }
    }
  }
}filter {
  if [fileset][module] == "system" {
    if [fileset][name] == "auth" {
      grok {
        match => { "message" => ["%{SYSLOGTIMESTAMP:[system][auth][timestamp]} %{SYSLOGHOST:[system][auth][hostname]} sshd(?:\[%{POSINT:[system][auth][pid]}\])?: %{DATA:[system][auth][ssh][event]} %{DATA:[system][auth][ssh][method]} for (invalid user )?%{DATA:[system][auth][user]} from %{IPORHOST:[system][auth][ssh][ip]} port %{NUMBER:[system][auth][ssh][port]} ssh2(: %{GREEDYDATA:[system][auth][ssh][signature]})?",
                  "%{SYSLOGTIMESTAMP:[system][auth][timestamp]} %{SYSLOGHOST:[system][auth][hostname]} sshd(?:\[%{POSINT:[system][auth][pid]}\])?: %{DATA:[system][auth][ssh][event]} user %{DATA:[system][auth][user]} from %{IPORHOST:[system][auth][ssh][ip]}",
                  "%{SYSLOGTIMESTAMP:[system][auth][timestamp]} %{SYSLOGHOST:[system][auth][hostname]} sshd(?:\[%{POSINT:[system][auth][pid]}\])?: Did not receive identification string from %{IPORHOST:[system][auth][ssh][dropped_ip]}",
                  "%{SYSLOGTIMESTAMP:[system][auth][timestamp]} %{SYSLOGHOST:[system][auth][hostname]} sudo(?:\[%{POSINT:[system][auth][pid]}\])?: \s*%{DATA:[system][auth][user]} :( %{DATA:[system][auth][sudo][error]} ;)? TTY=%{DATA:[system][auth][sudo][tty]} ; PWD=%{DATA:[system][auth][sudo][pwd]} ; USER=%{DATA:[system][auth][sudo][user]} ; COMMAND=%{GREEDYDATA:[system][auth][sudo][command]}",
                  "%{SYSLOGTIMESTAMP:[system][auth][timestamp]} %{SYSLOGHOST:[system][auth][hostname]} groupadd(?:\[%{POSINT:[system][auth][pid]}\])?: new group: name=%{DATA:system.auth.groupadd.name}, GID=%{NUMBER:system.auth.groupadd.gid}",
                  "%{SYSLOGTIMESTAMP:[system][auth][timestamp]} %{SYSLOGHOST:[system][auth][hostname]} useradd(?:\[%{POSINT:[system][auth][pid]}\])?: new user: name=%{DATA:[system][auth][user][add][name]}, UID=%{NUMBER:[system][auth][user][add][uid]}, GID=%{NUMBER:[system][auth][user][add][gid]}, home=%{DATA:[system][auth][user][add][home]}, shell=%{DATA:[system][auth][user][add][shell]}$",
                  "%{SYSLOGTIMESTAMP:[system][auth][timestamp]} %{SYSLOGHOST:[system][auth][hostname]} %{DATA:[system][auth][program]}(?:\[%{POSINT:[system][auth][pid]}\])?: %{GREEDYMULTILINE:[system][auth][message]}"] }
        pattern_definitions => {
          "GREEDYMULTILINE"=> "(.|\n)*"
        }
        remove_field => "message"
      }
      date {
        match => [ "[system][auth][timestamp]", "MMM  d HH:mm:ss", "MMM dd HH:mm:ss" ]
      }
      geoip {
        source => "[system][auth][ssh][ip]"
        target => "[system][auth][ssh][geoip]"
      }
    }
    else if [fileset][name] == "syslog" {
      grok {
        match => { "message" => ["%{SYSLOGTIMESTAMP:[system][syslog][timestamp]} %{SYSLOGHOST:[system][syslog][hostname]} %{DATA:[system][syslog][program]}(?:\[%{POSINT:[system][syslog][pid]}\])?: %{GREEDYMULTILINE:[system][syslog][message]}"] }
        pattern_definitions => { "GREEDYMULTILINE" => "(.|\n)*" }
        remove_field => "message"
      }
      date {
        match => [ "[system][syslog][timestamp]", "MMM  d HH:mm:ss", "MMM dd HH:mm:ss" ]
      }
    }
  }
}filter {
  if [fileset][module] == "system" {
    if [fileset][name] == "auth" {
      grok {
        match => { "message" => ["%{SYSLOGTIMESTAMP:[system][auth][timestamp]} %{SYSLOGHOST:[system][auth][hostname]} sshd(?:\[%{POSINT:[system][auth][pid]}\])?: %{DATA:[system][auth][ssh][event]} %{DATA:[system][auth][ssh][method]} for (invalid user )?%{DATA:[system][auth][user]} from %{IPORHOST:[system][auth][ssh][ip]} port %{NUMBER:[system][auth][ssh][port]} ssh2(: %{GREEDYDATA:[system][auth][ssh][signature]})?",
                  "%{SYSLOGTIMESTAMP:[system][auth][timestamp]} %{SYSLOGHOST:[system][auth][hostname]} sshd(?:\[%{POSINT:[system][auth][pid]}\])?: %{DATA:[system][auth][ssh][event]} user %{DATA:[system][auth][user]} from %{IPORHOST:[system][auth][ssh][ip]}",
                  "%{SYSLOGTIMESTAMP:[system][auth][timestamp]} %{SYSLOGHOST:[system][auth][hostname]} sshd(?:\[%{POSINT:[system][auth][pid]}\])?: Did not receive identification string from %{IPORHOST:[system][auth][ssh][dropped_ip]}",
                  "%{SYSLOGTIMESTAMP:[system][auth][timestamp]} %{SYSLOGHOST:[system][auth][hostname]} sudo(?:\[%{POSINT:[system][auth][pid]}\])?: \s*%{DATA:[system][auth][user]} :( %{DATA:[system][auth][sudo][error]} ;)? TTY=%{DATA:[system][auth][sudo][tty]} ; PWD=%{DATA:[system][auth][sudo][pwd]} ; USER=%{DATA:[system][auth][sudo][user]} ; COMMAND=%{GREEDYDATA:[system][auth][sudo][command]}",
                  "%{SYSLOGTIMESTAMP:[system][auth][timestamp]} %{SYSLOGHOST:[system][auth][hostname]} groupadd(?:\[%{POSINT:[system][auth][pid]}\])?: new group: name=%{DATA:system.auth.groupadd.name}, GID=%{NUMBER:system.auth.groupadd.gid}",
                  "%{SYSLOGTIMESTAMP:[system][auth][timestamp]} %{SYSLOGHOST:[system][auth][hostname]} useradd(?:\[%{POSINT:[system][auth][pid]}\])?: new user: name=%{DATA:[system][auth][user][add][name]}, UID=%{NUMBER:[system][auth][user][add][uid]}, GID=%{NUMBER:[system][auth][user][add][gid]}, home=%{DATA:[system][auth][user][add][home]}, shell=%{DATA:[system][auth][user][add][shell]}$",
                  "%{SYSLOGTIMESTAMP:[system][auth][timestamp]} %{SYSLOGHOST:[system][auth][hostname]} %{DATA:[system][auth][program]}(?:\[%{POSINT:[system][auth][pid]}\])?: %{GREEDYMULTILINE:[system][auth][message]}"] }
        pattern_definitions => {
          "GREEDYMULTILINE"=> "(.|\n)*"
        }
        remove_field => "message"
      }
      date {
        match => [ "[system][auth][timestamp]", "MMM  d HH:mm:ss", "MMM dd HH:mm:ss" ]
      }
      geoip {
        source => "[system][auth][ssh][ip]"
        target => "[system][auth][ssh][geoip]"
      }
    }
    else if [fileset][name] == "syslog" {
      grok {
        match => { "message" => ["%{SYSLOGTIMESTAMP:[system][syslog][timestamp]} %{SYSLOGHOST:[system][syslog][hostname]} %{DATA:[system][syslog][program]}(?:\[%{POSINT:[system][syslog][pid]}\])?: %{GREEDYMULTILINE:[system][syslog][message]}"] }
        pattern_definitions => { "GREEDYMULTILINE" => "(.|\n)*" }
        remove_field => "message"
      }
      date {
        match => [ "[system][syslog][timestamp]", "MMM  d HH:mm:ss", "MMM dd HH:mm:ss" ]
      }
    }
  }
}
Save and close the file when you are finished.
Finally, create a configuration file called 30-elasticsearch-output.conf:
sudo nano /etc/logstash/conf.d/30-elasticsearch-output.conf Insert the following output configuration. Essentially, this output configures Logstash to store the Beats data in Elasticsearch, which is running at localhost:9200, in an index named after the Beat used. The Beat used in this tutorial is Filebeat: /etc/logstash/conf.d/30-elasticsearch-output.conf
output {
  elasticsearch {
    hosts => ["localhost:9200"]
    manage_template => false
    index => "%{[@metadata][beat]}-%{[@metadata][version]}-%{+YYYY.MM.dd}"
  }
}
Save and close the file.
If you want to add filters for other applications that use the Filebeat input, be sure to name the files so they are sorted between the input and output configuration, meaning that the file names should begin with a two-digit number between 02 and 30.
Test your Logstash configuration with this command:
sudo -u logstash /usr/share/logstash/bin/logstash --path.settings /etc/logstash -t
If there are no syntax errors, your output will display Configuration OK after a few seconds. If you do not see this in your output, check for any errors that appear in your output and update your configuration to correct them.
If your configuration test is successful, start and enable Logstash to put the configuration changes into effect:
sudo systemctl start logstash
sudo systemctl enable logstash
Now that Logstash is running correctly and is fully configured, let's install Filebeat.
Step 4 – Installing and Configuring Filebeat
The Elastic Stack uses several lightweight data shippers called Beats to collect data from various sources and transport it to Logstash or Elasticsearch. The Beats that are currently available from Elastic are:
- Filebeat : collects and ships log files.
- Metricbeat : collects metrics from your systems and services.
- Packetbeat : collects and analyzes network data.
- Winlogbeat : collects Windows event logs.
- Auditbeat : collects Linux audit framework data and monitors file integrity.
- Heartbeat : monitors services for their availability with active probing.
In this tutorial we will use Filebeat to forward local logs to our Elastic Stack.
Install Filebeat using apt:
sudo apt install filebeat
Next, configure Filebeat to connect to Logstash. Here, we will modify the example configuration file that comes with Filebeat.
Open the Filebeat configuration file:
sudo nano /etc/filebeat/filebeat.ymlNote: As with Elasticsearch, Filebeat's configuration file is in YAML format. This means that proper indentation is crucial, so be sure to use the same number of spaces as indicated in these instructions.
Filebeat supports numerous outputs, but you will usually send events directly to either Elasticsearch or Logstash for additional processing. In this tutorial, we will use Logstash to perform additional processing on the data collected by Filebeat. Filebeat will not need to send any data directly to Elasticsearch, so let's disable that output. To do so, find the output.elasticsearch section and comment out the following lines by preceding them with a #: /etc/filebeat/filebeat.yml
...
#output.elasticsearch:
  # Array of hosts to connect to.
  #hosts: ["localhost:9200"]
...
Then configure the output.logstash section. Uncomment the lines output.logstash: and hosts: ["localhost:5044"] by removing the #. This will configure Filebeat to connect to Logstash on your Elastic Stack server at port 5044, the port for which we specified a Logstash input earlier: /etc/filebeat/filebeat.yml
output.logstash:
  # The Logstash hosts
  hosts: ["localhost:5044"]
Save and close the file.
Filebeat's functionality can be extended with Filebeat modules . In this tutorial we will use the system module, which collects and parses logs created by the system logging service of common Linux distributions.
Let's enable it:
sudo filebeat modules enable system
You can see a list of enabled and disabled modules by running:
sudo filebeat modules list
You will see a list similar to the following:
Output
Enabled:
system

Disabled:
apache2
auditd
elasticsearch
icinga
iis
kafka
kibana
logstash
mongodb
mysql
nginx
osquery
postgresql
redis
traefik
...........
By default, Filebeat is configured to use default paths for the syslog and authorization logs. In the case of this tutorial, you do not need to change anything in the configuration. You can see the parameters of the module in the /etc/filebeat/modules.d/system.yml configuration file.
Next, load the index template into Elasticsearch. An Elasticsearch index is a collection of documents that have similar characteristics. Indexes are identified by a name, which is used to refer to the index when performing various operations within it. The index template will be applied automatically when a new index is created.
To load the template, use the following command:
sudo filebeat setup --template -E output.logstash.enabled=false -E 'output.elasticsearch.hosts=["localhost:9200"]'
Output
Loaded index template
Filebeat comes packaged with sample Kibana dashboards that allow you to visualize Filebeat data in Kibana. Before you can use the dashboards, you need to create the index pattern and load the dashboards into Kibana.
As the dashboards load, Filebeat connects to Elasticsearch to check version information. To load the dashboards when Logstash is enabled, you need to disable the Logstash output and enable the Elasticsearch output:
sudo filebeat setup -e -E output.logstash.enabled=false -E output.elasticsearch.hosts=['localhost:9200'] -E setup.kibana.host=localhost:5601
You will see output similar to this:
Output
2018-09-10T08:39:15.844Z        INFO    instance/beat.go:273    Setup Beat: filebeat; Version: 7.6.1
2018-09-10T08:39:15.845Z        INFO    elasticsearch/client.go:163     Elasticsearch url: http://localhost:9200
2018-09-10T08:39:15.845Z        INFO    pipeline/module.go:98   Beat name: elk
2018-09-10T08:39:15.845Z        INFO    elasticsearch/client.go:163     Elasticsearch url: http://localhost:9200
2018-09-10T08:39:15.849Z        INFO    elasticsearch/client.go:708     Connected to Elasticsearch version 7.6.1
2018-09-10T08:39:15.856Z        INFO    template/load.go:129    Template already exists and will not be overwritten.
Loaded index template
Loading dashboards (Kibana must be running and reachable)
2018-09-10T08:39:15.857Z        INFO    elasticsearch/client.go:163     Elasticsearch url: http://localhost:9200
2018-09-10T08:39:15.865Z        INFO    elasticsearch/client.go:708     Connected to Elasticsearch version 7.6.1
2018-09-10T08:39:15.865Z        INFO    kibana/client.go:113    Kibana url: http://localhost:5601
2018-09-10T08:39:45.357Z        INFO    instance/beat.go:659    Kibana dashboards successfully loaded.
Loaded dashboards
2018-09-10T08:39:45.358Z        INFO    elasticsearch/client.go:163     Elasticsearch url: http://localhost:9200
2018-09-10T08:39:45.361Z        INFO    elasticsearch/client.go:708     Connected to Elasticsearch version 7.6.1
2018-09-10T08:39:45.361Z        INFO    kibana/client.go:113    Kibana url: http://localhost:5601
2018-09-10T08:39:45.455Z        WARN    fileset/modules.go:388  X-Pack Machine Learning is not enabled
Loaded machine learning job configurations
Now you can start and enable Filebeat:
sudo systemctl start filebeat
sudo systemctl enable filebeat
If you have set up your Elastic Stack correctly, Filebeat will begin shipping your syslog and authorization logs to Logstash, which will then load that data into Elasticsearch.
To verify that Elasticsearch is indeed receiving this data, query the Filebeat index with this command:
curl -XGET 'http://localhost:9200/filebeat-*/_search?pretty'
You will see output similar to this:
Output
...
{
  "took" : 1,
  "timed_out" : false,
  "_shards" : {
    "total" : 1,
    "successful" : 1,
    "skipped" : 0,
    "failed" : 0
  },
  "hits" : {
    "total" : {
      "value" : 10000,
      "relation" : "gte"
    },
    "max_score" : 1.0,
    "hits" : [
      {
        "_index" : "filebeat-7.6.1-2020.03.22-000001",
        "_type" : "_doc",
        "_id" : "_vafAnEB9n8Ibpfym4VS",
        "_score" : 1.0,
        "_source" : {
          "agent" : {
            "hostname" : "ElasticSearch",
            "id" : "ee9d1a5d-75a7-4283-a126-ee90c1455173",
            "type" : "filebeat",
            "ephemeral_id" : "b927d9fb-500a-43ab-a20c-598d55c080ac",
            "version" : "7.6.1"
          },
          "process" : {
            "name" : "kernel"
          },
          "log" : {
            "file" : {
              "path" : "/var/log/syslog"
            },
            "offset" : 97048
          },
          "fileset" : {
            "name" : "syslog"
          },
...
If your output shows a total of 0 hits, Elasticsearch is not loading any logs under the index you searched for, and you will need to review your setup for errors. If you received the expected output, continue to the next step, in which we will see how to navigate through some of Kibana's dashboards.
Step 5 – Exploring Kibana Dashboards
Let's look at Kibana, the web interface we installed earlier.
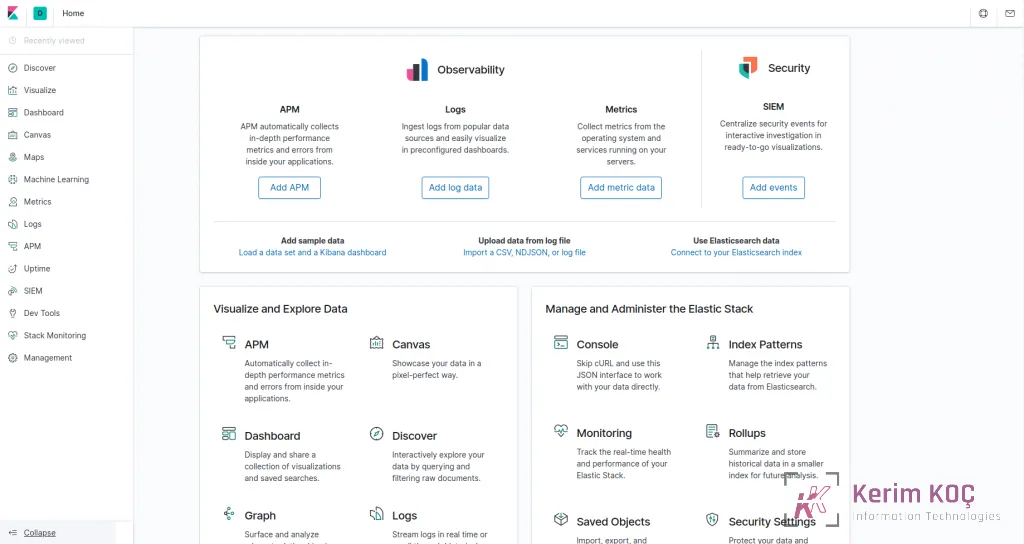
In a web browser, go to the FQDN or public IP address of your Elastic Stack server. After entering the login credentials you defined in Step 2, you will see the Kibana homepage:
Click the Discover link in the left-hand navigation bar. On the Discover page, select the predefined filebeat-* index pattern to see the Filebeat data. By default, this will show you all of the log data from the last 15 minutes. You will see a histogram with log events, and some log messages below:
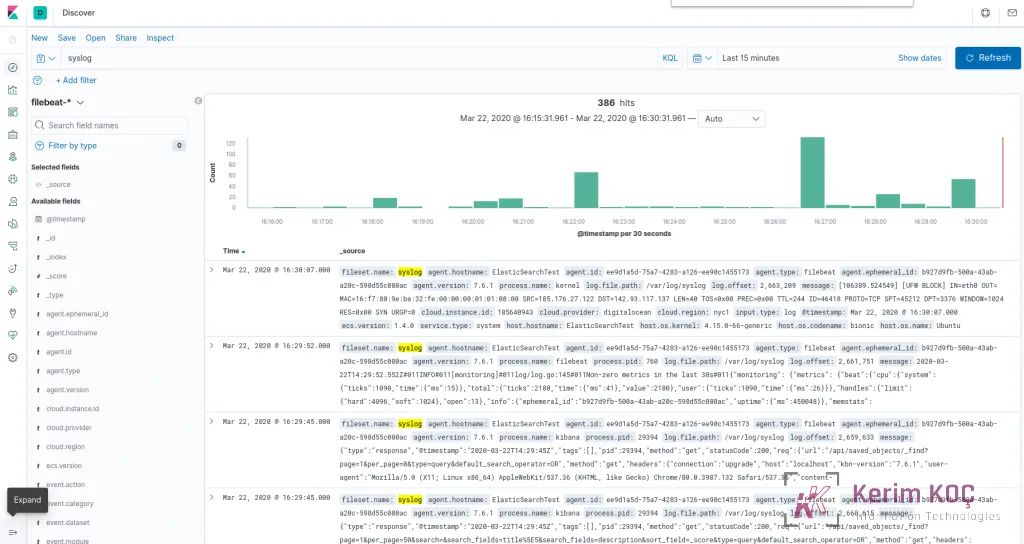
Here, you can search and browse through your logs and also customize your dashboard. At this point, though, there will not be much in there because you are only gathering system logs from your Elastic Stack server.
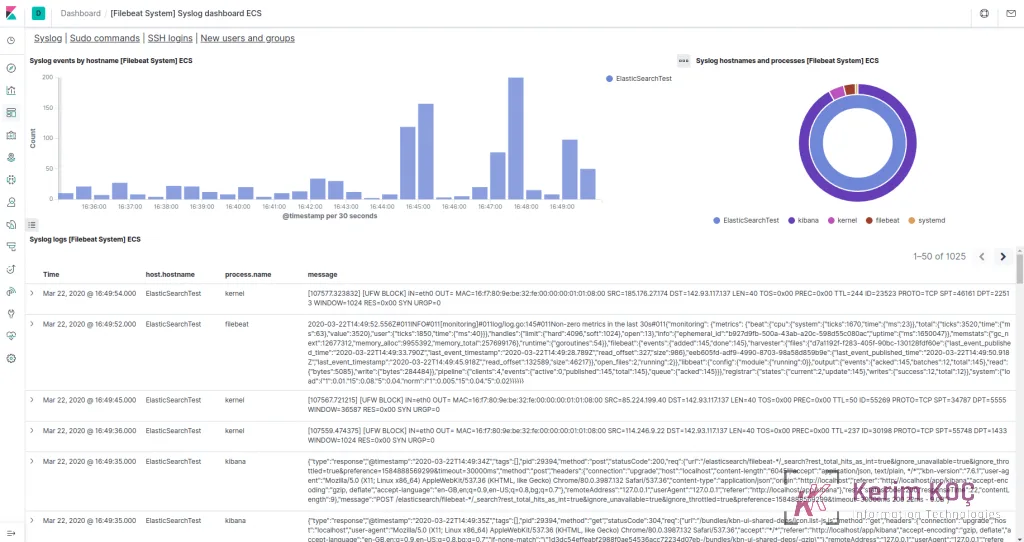
Use the left-hand panel to navigate to the Dashboard page and search for the Filebeat System dashboards. Once there, you can search for the sample dashboards that come with Filebeat's system module.
For example, you can view detailed statistics based on your syslog messages:
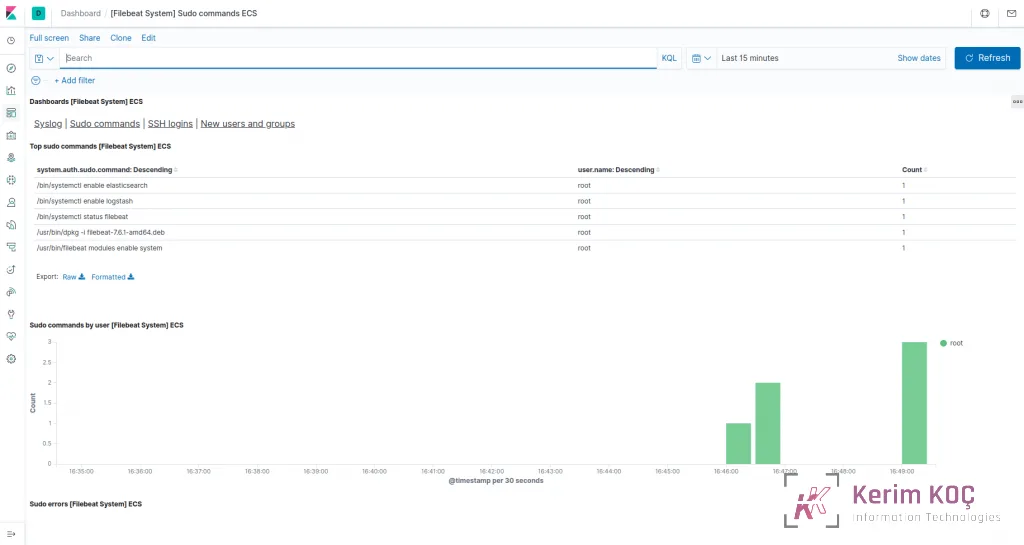
You can also see which users have used the sudo command and when:
Kibana has many other features, such as graphing and filtering, so feel free to explore.
Conclusion
In this tutorial, you learned how to install and configure the Elastic Stack to collect and analyze system logs. Remember that you can send nearly any type of log or indexed data to Logstash using Beats, but the data becomes even more useful if it is parsed and structured with a Logstash filter, as this transforms the data into a consistent format that can be read easily by Elasticsearch.


