 Kerim Koç

Contents
When choosing a server to run your Jitsi Meet instance, you need to consider the system resources required to host conference rooms. The following benchmark information was collected from a single-core virtual machine using high-quality video settings:
| CPU | Server Bandwidth | |
|---|---|---|
| Two Participants | 5% | 30Kbps Up, 100Kbps Down |
| Three Participants | 15% | 5 Mbps Up, 3 Mbps Down |
The jump in resource usage between two and three participants is because Jitsi routes call data directly between clients when there are two people. Call data is routed through the Jitsi Meet server when more than two clients are present.
Before starting Step 1, log in to your server as a non-root, sudo-enabled user.
Step 1 — Setting the System Hostname
In this step, you will change the system's hostname to match the domain name you plan to use for your Jitsi Meet instance. You will also resolve this hostname locally to your server's public IP. Jitsi Meet uses both settings when installing and generating its configuration files.
First, set the system's hostname to the domain name you will use for your Jitsi instance. The following command will set the current hostname and change the /etc/hostnamefile, which holds the system's hostname between reboots:
sudo hostnamectl set-hostname jitsi.your_domain
Enter your password when prompted. The command you ran breaks down as follows:
hostnamectl: A utility from the systemd toolkit for managing the system hostname.set-hostname: Sets the system hostname.
Check that the hostname was set with the following command:
hostname
This command returns the hostname you set with hostnamectl:
jitsi.your-domain
Next, you will set up a local mapping of the server's hostname to its public IP address. Do this by opening /etc/hostswith nano or your favorite text editor:
sudo nano /etc/hosts
The contents of this file look like the following:
/etc/hosts
# Your system has configured 'manage_etc_hosts' as True.
# As a result, if you wish for changes to this file to persist
# then you will need to either
# a.) make changes to the master file in /etc/cloud/templates/hosts.debian.tmpl
# b.) change or remove the value of 'manage_etc_hosts' in
#     /etc/cloud/cloud.cfg or cloud-config from user-data
#
127.0.1.1 server1 server1
127.0.0.1 localhost

# The following lines are desirable for IPv6 capable hosts
::1 localhost ip6-localhost ip6-loopback
ff02::1 ip6-allnodes
ff02::2 ip6-allrouters
Then add the following line below the 127.0.0.1 localhostline:/etc/hosts
...
public_ip jitsi.your_domain
...
For example, if your server's public IP is 1.2.3.4, the updated file looks like this:/etc/hosts
# Your system has configured 'manage_etc_hosts' as True.
# As a result, if you wish for changes to this file to persist
# then you will need to either
# a.) make changes to the master file in /etc/cloud/templates/hosts.debian.tmpl
# b.) change or remove the value of 'manage_etc_hosts' in
#     /etc/cloud/cloud.cfg or cloud-config from user-data
#
127.0.1.1 server1 server1
127.0.0.1 localhost
1.2.3.4 jitsi.your_domain

# The following lines are desirable for IPv6 capable hosts
::1 localhost ip6-localhost ip6-loopback
ff02::1 ip6-allnodes
ff02::2 ip6-allrouters
Save and close the file.
Your server now has the hostname and IP address setup that Jitsi requires when it is installed. In the next step, you will open the firewall ports that Jitsi and the TLS certificate installer need.
Step 2 — Configuring the Firewall
If you have not yet allowed SSH traffic through UFW, run the following command:
sudo ufw allow OpenSSH
Next, open the following ports for Jitsi:
80/tcp: The port used for the TLS certificate registration request.443/tcp: The port used for the conference room creation web page.10000/udp3478/udp5349/tcp: Ports that will send and receive encrypted call traffic.
Run the following commands to open these ports with ufw:
sudo ufw allow 80/tcp
sudo ufw allow 443/tcp
sudo ufw allow 3478/udp
sudo ufw allow 5349/tcp
sudo ufw allow 10000/udp
Check that they have all been added with the ufw status command:
sudo ufw status
You will get the following output (including OpenSSH), indicating that these ports are open:
OutputStatus: active

To                         Action      From
--                         ------      ----
OpenSSH                    ALLOW       Anywhere
80/tcp                     ALLOW       Anywhere
443/tcp                    ALLOW       Anywhere
3478/udp                   ALLOW       Anywhere
5349/tcp                   ALLOW       Anywhere
10000/udp                  ALLOW       Anywhere
OpenSSH (v6)               ALLOW       Anywhere (v6)
80/tcp (v6)                ALLOW       Anywhere (v6)
443/tcp (v6)               ALLOW       Anywhere (v6)
3478/udp (v6)              ALLOW       Anywhere (v6)
5349/tcp (v6)              ALLOW       Anywhere (v6)
10000/udp (v6)             ALLOW       Anywhere (v6)
If you have not enabled UFW, you may see the following inactive status instead of the ports:
OutputStatus: inactive
If so, you need to enable ufw. Run the following command and answer y when prompted to enable ufw:
sudo ufw enable
Check the status again to make sure the ports are open.
With the ports open, the server is ready for the Jitsi installation, which you will complete in the next step.
Step 3 — Installing Jitsi Meet
Now you will add the Jitsi and Prosody APT repositories to your server. Prosody is an open-source XMPP chat server that Jitsi uses for messaging and administrator authentication. Then, you will install the Jitsi Meet package from its repository, which will let you always run the latest stable Jitsi Meet package.
First, download the Jitsi GPG key with the curldownload utility:
curl https://download.jitsi.org/jitsi-key.gpg.key -o jitsi-key.gpg.key
In this command, -ospecifies the name of the file where the downloaded key data will be saved. The aptpackage manager will use this GPG key to verify the packages you download from the Jitsi repository.
Next, add the GPG key to your system's keyring with the gpg command below:
sudo gpg --output /usr/share/keyrings/jitsi-key.gpg --dearmor jitsi-key.gpg.key
With this gpg command, you use --output to create a file name in which to save the keyring, and --dearmor to unpack the key into a format APT can use.
Now you will add the Jitsi repository to your server by creating a new APT sources file containing the Jitsi repository. Open and create the new file with the following command:
sudo nano /etc/apt/sources.list.d/jitsi-stable.listAdd this line to the /etc/apt/sources.list.d/jitsi-stable.list file: /etc/apt/sources.list.d/jitsi-stable.list
deb [signed-by=/usr/share/keyrings/jitsi-key.gpg] https://download.jitsi.org stable/
Save and exit the editor.
Next, you will follow the same steps to add the Prosody package. Download the Prosody GPG key:
curl https://prosody.im/files/prosody-debian-packages.key -o prosody-debian-packages.key
Then, add the key to your server's keyring:
sudo gpg --output /usr/share/keyrings/prosody-keyring.gpg --dearmor prosody-debian-packages.key
Next, open a new sources file for Prosody:
sudo nano /etc/apt/sources.list.d/prosody.list
Add the following line to the currently empty Prosody sources file: /etc/apt/sources.list.d/prosody.list
deb [signed-by=/usr/share/keyrings/prosody-keyring.gpg] http://packages.prosody.im/debian jammy main
Save and exit the editor.
You can now delete the GPG keys you downloaded, since they are no longer needed:
rm jitsi-key.gpg.key prosody-debian-packages.key
Finally, perform a system update to gather the package lists from the new repositories, and then install the jitsi-meetpackage:
sudo apt update
sudo apt install jitsi-meet
Press y when prompted to confirm the installation of the packages.
During installation, you will be asked to enter the domain name you want to use for your Jitsi Meet instance jitsi-meet(for example, jitsi.your-domain).
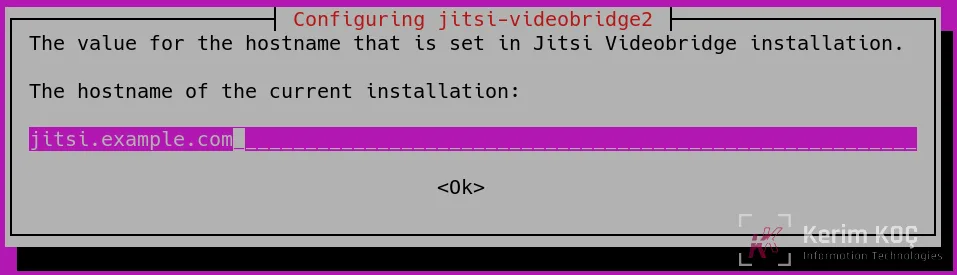
Use the TABkey to move the cursor from the hostname field to highlight the <OK> button. When <OK> is highlighted, press ENTERto submit the hostname.
A new dialog will then be displayed asking whether you want Jitsi to generate and use a self-signed TLS certificate or use an existing certificate:
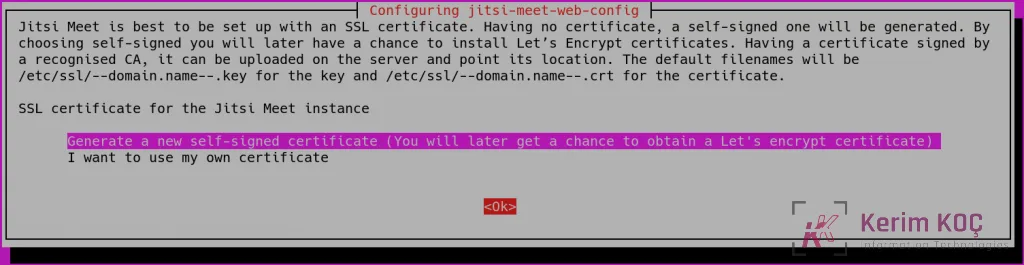
If you do not have a TLS certificate for your Jitsi domain name, select Generate a new self-signed certificate.
Your Jitsi Meet instance is now installed using a self-signed TLS certificate. If you do not yet have a TLS certificate, you will get browser warnings, so you will obtain a signed TLS certificate in the next step.
Step 4 — Obtaining a Signed TLS Certificate
Jitsi Meet uses TLS certificates to encrypt call traffic so that no one can eavesdrop on your call while it travels over the internet. TLS certificates are the same mechanism websites use to enable HTTPS-protected pages.
Jitsi uses the certbot utility to obtain and manage free but industry-standard and secure TLS certificates. You need to install this utility so that Jitsi can obtain the certificate it needs.
Install certbot with the following command:
sudo apt install certbot
Press y when prompted to confirm the installation of the certbot package.
Jitsi Meet provides a script to automatically download a TLS certificate for your domain name. Run this certificate installation script provided by Jitsi Meet, /usr/share/jitsi-meet/scripts/install-letsencrypt-cert.sh, with the following command:
sudo /usr/share/jitsi-meet/scripts/install-letsencrypt-cert.sh
When you run it, the script prints the following information and asks you to provide an email address:
Output-------------------------------------------------------------------------
This script will:
- Need a working DNS record pointing to this machine(for domain jitsi.your_domain)
- Download certbot-auto from https://dl.eff.org to /usr/local/sbin
- Install additional dependencies in order to request Let’s Encrypt certificate
- If running with jetty serving web content, will stop Jitsi Videobridge
- Configure and reload nginx or apache2, whichever is used
- Configure the coturn server to use Let's Encrypt certificate and add required deploy hooks
- Add command in weekly cron job to renew certificates regularly
You need to agree to the ACME server's Subscriber Agreement
(https://letsencrypt.org/documents/LE-SA-v1.1.1-August-1-2016.pdf)
by providing an email address for important account notifications
Enter your email and press [ENTER]:
This email address will be submitted to the certificate issuer https://letsencrypt.org and used to notify you about security and other matters related to the certificate. You must enter an email address here to continue with the installation.
The script will complete the installation and configuration of an SSL certificate for your Jitsi server without further user input.
The default configuration for Jitsi Meet is that anyone who visits your Jitsi Meet server's home page can create a new conference room. This default mode uses your server's system resources to run the conference room and is undesirable for unauthorized users. In the next step, you will update these settings.
Step 5 — Locking Conference Room Creation
You will now configure your Jitsi Meet server to allow only registered users to create conference rooms.
The files you will edit were generated by the installer and configured with your domain name. The variable jitsi.your_domainwill be used in place of your domain name in the examples below.
First, open with a text editor: /etc/prosody/conf.avail/jitsi.your_domain.cfg.lua
sudo nano /etc/prosody/conf.avail/your_domain.cfg.lua
Next, use nano's search function to find the line you need to edit in this file: CTRL+W. Press CTRL+W, then enter authentication = "anonymous"in the search field. Press ENTERto run the search. Your search entry should look similar to the contents of the red box below:
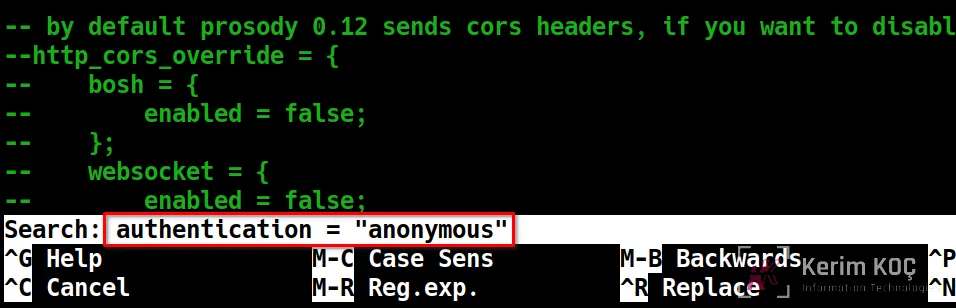
This search will take the cursor to the line you need to edit. Edit the following line from your existing installation: /etc/prosody/conf.avail/jitsi.your_domain.cfg.lua
authentication = "anonymous"
For a new installation: /etc/prosody/conf.avail/jitsi.your_domain.cfg.lua
authentication = "internal_plain"
This configuration tells Jitsi Meet to enforce username and password authentication before allowing a new visitor to create a conference room.
In the same file, add the following section to the end of the file: /etc/prosody/conf.avail/your_domain.cfg.lua
...
VirtualHost "guest.jitsi.your_domain"
    authentication = "anonymous"
    c2s_require_encryption = false
    modules_enabled = {
            "bosh";
            "ping";
            "pubsub";
            "speakerstats";
            "turncredentials";
            "conference_duration";
    }
This configuration allows any user to join conference rooms created by an authenticated user. However, the guest must have the unique URL (and an optional password) in order to enter.
Here you have prefixed your domain name with guest.. For example, the correct name to enter here for jitsi.your_domainis guest.jitsi.your_domain. The guest.hostname is used internally by Jitsi Meet, so you never enter it into a browser, nor do you need a separate DNS record for the guest.hostname.
When you are done, save and close the file. /etc/prosody/conf.avail/jitsi.your_domain.cfg.lua
Next, open another configuration file with a text editor: /etc/jitsi/meet/jitsi.your_domain-config.js
sudo nano /etc/jitsi/meet/jitsi.your_domain-config.js
Use the search tool CTRL+Wagain to search for anonymousdomain:, which will take you to the following line: /etc/jitsi/meet/alan_adiniz-config.js
// anonymousdomain: 'guest.example.com',
Edit this line so it looks like the following by removing the double slash //at the start of the line: /etc/jitsi/meet/alan_adiniz-config.js
anonymousdomain: 'guest.jitsi.your_domain',
You will use the hostname you used earlier. This configuration tells Jitsi Meet which internal hostname to use for unauthenticated guests. Save and close the file. guest.jitsi.your_domain
Next, create and open /etc/jitsi/jicofo/sip-communicator.properties:
sudo nano /etc/jitsi/jicofo/sip-communicator.properties
Add the following line to complete the configuration changes: /etc/jitsi/jicofo/sip-communicator.properties
org.jitsi.jicofo.auth.URL=XMPP:jitsi.your_domain
This configuration points one of the Jitsi Meet processes to the local server that performs the user authentication that is now required. When you are done, save and close the file.
Your Jitsi Meet instance is now configured so that only registered users can create conference rooms. Once a conference room has been created, anyone can join it without being a registered user. All they need is the unique conference room address and an optional password set by the room's creator.
Now that Jitsi Meet is configured to require authenticated users for room creation, you need to register those users and their passwords. You will use the prosodyctlutility to do this.
To add a user to your server, run the following command:
sudo prosodyctl register user your_domain password
The user you add here is not a system user. They will only be able to create a conference room and will not be able to log in to your server over SSH.
When you run this command, you may see the following warning: lua 5.1 warning
general warn Lua 5.1 has several issues and support is being phased out, consider upgrading
The lua5.1 package is still a required dependency for Prosody and does not pose any security risk to your system that uses it. As Prosody and Jitsi Meet are developed further, the lua5.1 dependency will be phased out.
Finally, restart all Jitsi Meet processes to load the new configuration:
sudo systemctl restart prosody.service jicofo.service jitsi-videobridge2.service
Your Jitsi Meet server is now fully installed, configured and running. In the final step, you will create a new conference room.
Step 6 – Opening a Conference Room and Inviting Participants
You can now browse to your new Jitsi Meet server and start using it. Open your browser and enter your Jitsi domain name (with https) in the address bar.
Press the Start meeting button on the landing page to start a meeting:
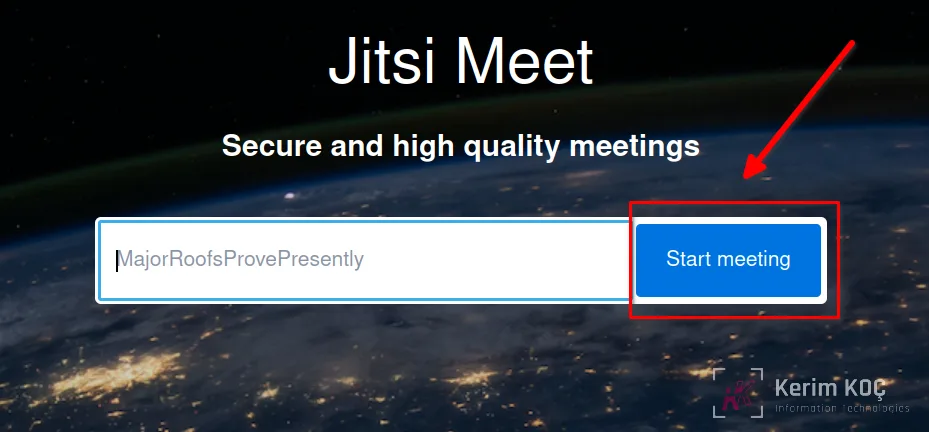
When you click the Start meeting button, a new meeting will begin. The following dialog will immediately ask whether you are the meeting host (the meeting's administrator):
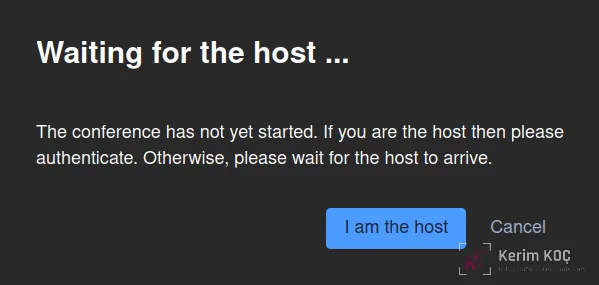
You need to click the I am the host button to continue. After clicking this button, you will be asked to enter your administrator username and password in the following field:
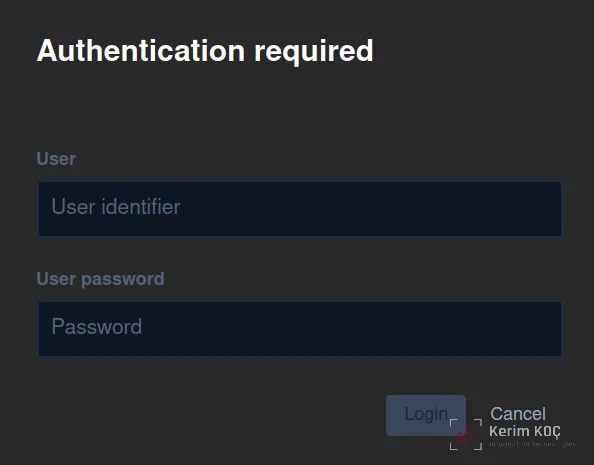
The username and password are the ones you set in Step 5 with the prosodyctlutility. Enter the username and password and click Login, which will create the new meeting and designate you as the moderator.
Now that the meeting is open and running, you can invite participants. Click the participants icon in the bottom panel:

This action opens a panel on the right side. Click the Invite someone button:
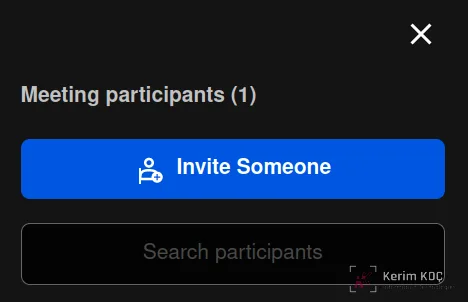
This action will open the Invite more people dialog. Copy the meeting's unique URL by clicking the copy icon:
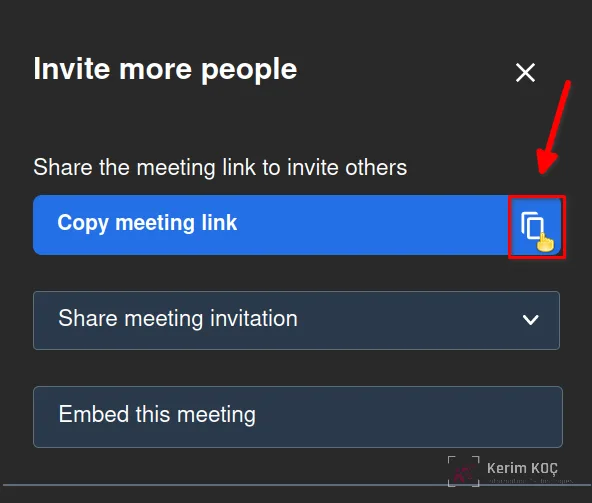
You can now paste the meeting URL into an email or chat program to send to anyone you want to join the meeting. After you have created it, they will not need a username and password to access the meeting.
You can test this yourself after creating a meeting by opening a new incognito browser tab and pasting the meeting URL there. You will be able to join the meeting as a new participant without needing a username and password.


