 Kerim Koç

Contents
Asterisk is a free and open-source framework created by Sangoma for building communications applications for both small businesses and large-scale use cases . Asterisk is a software-based solution that turns your old computer into a communications server powering IP PBX systems, VoIP gateways, conference servers and other custom solutions. Solutions built with Asterisk power call centers, carriers and government agencies around the world.
In this blog post we will look at installing Asterisk 18 LTS on an Ubuntu 20.04|18.04 server. As of this writing, the latest version of Asterisk is 18. Also keep in mind that this is not a long-term release and should not be used for production deployments that need Digium support for many years.
Here are some key points about Asterisk:
- It is written in the C programming language.
- It is written to run on Linux and other Unix variants.
- It powers business phone systems
- It connects many different telephony protocols together
- It provides many powerful features and applications , VoIP gateways and conferencing systems , and is a toolkit for building an IP PBX .
- It supports VoIP phones as well as PSTN and POTS
- Among others, it uses the most common VoIP protocol, SIP .
Install Asterisk 18 LTS on Ubuntu 20.04|18.04
To install Asterisk 18 on an Ubuntu 20.04|18.04 Linux system, you will follow the steps in the next sections. Because Asterisk is built to be modular, adding extra features after installation is not difficult. It can be done easily.
Step 1: Update the Ubuntu System
We will begin our installation by updating the APT package index and upgrading all installed packages on the system. I recommend performing this installation on a fresh system so that you do not run into any problems with running services.
sudo apt update
sudo apt -y upgrade
If the upgrade was successful, you can reboot your system.
sudo systemctl reboot
Step 2: Install Build Dependencies
After the system reboots, log in and install all the dependencies required to build Asterisk on the Ubuntu 20.04|18.04 Linux machine.
sudo apt update
sudo add-apt-repository universe
sudo apt -y install git curl wget libnewt-dev libssl-dev libncurses5-dev subversion libsqlite3-dev build-essential libjansson-dev libxml2-dev  uuid-dev
If you have a good internet connection, the installation takes only a few minutes.
Step 3: Download the Asterisk 18 Tarball
You will not find the latest version of Asterisk in the official system repositories. We will need to download the tarball manually and build the application from source.
On Ubuntu 20.04, the version available in the APT repositories is 16.
$ sudo apt policy asterisk
asterisk:
  Installed: (none)
  Candidate: 1:16.2.1~dfsg-2ubuntu1
  Version table:
     1:16.2.1~dfsg-2ubuntu1 500
        500 http://archive.ubuntu.com/ubuntu focal/universe amd64 Packages
        500 http://mirror.hetzner.de/ubuntu/packages focal/universe amd64 Packages
Use the wget command to download the archive file.
cd ~
wget http://downloads.asterisk.org/pub/telephony/asterisk/asterisk-18-current.tar.gz
Extract the file with tar.
tar xvf asterisk-18-current.tar.gz
Run the following command to download the mp3 decoder library into the source tree .
cd asterisk-18*/
contrib/scripts/get_mp3_source.sh
Expected command output:
A    addons/mp3
A    addons/mp3/MPGLIB_README
A    addons/mp3/common.c
A    addons/mp3/huffman.h
A    addons/mp3/tabinit.c
A    addons/mp3/Makefile
A    addons/mp3/README
A    addons/mp3/decode_i386.c
A    addons/mp3/dct64_i386.c
A    addons/mp3/MPGLIB_TODO
A    addons/mp3/mpg123.h
A    addons/mp3/layer3.c
A    addons/mp3/mpglib.h
A    addons/mp3/decode_ntom.c
A    addons/mp3/interface.c
Exported revision 202.
Make sure all dependencies are resolved:
sudo contrib/scripts/install_prereq install
You should get a success message at the end:
#############################################
## install completed successfully
#############################################
Step 4: Compile and Install Asterisk 18 on Ubuntu 20.04|18.04
After installing the dependencies, you should be ready to build Asterisk 18 from the source we downloaded.
Run the configure script to satisfy the build dependencies .
./configure
A successful run should produce output like the following:
.....
configure: creating ./config.status
config.status: creating makeopts
config.status: creating autoconfig.h
configure: Menuselect build configuration successfully completed

               .$$$$$$$$$$$$$$$=..
            .$7$7..          .7$$7:.
          .$$:.                 ,$7.7
        .$7.     7$$$$           .$$77
     ..$$.       $$$$$            .$$$7
    ..7$   .?.   $$$$$   .?.       7$$$.
   $.$.   .$$$7. $$$$7 .7$$$.      .$$$.
 .777.   .$$$$$$77$$$77$$$$$7.      $$$,
 $$$~      .7$$$$$$$$$$$$$7.       .$$$.
.$$7          .7$$$$$$$7:          ?$$$.
$$$          ?7$$$$$$$$$$I        .$$$7
$$$       .7$$$$$$$$$$$$$$$$      :$$$.
$$$       $$$$$$7$$$$$$$$$$$$    .$$$.
$$$        $$$   7$$$7  .$$$    .$$$.
$$$$             $$$$7         .$$$.
7$$$7            7$$$$        7$$$
 $$$$$                        $$$
  $$$$7.                       $$  (TM)
   $$$$$$$.           .7$$$$$$  $$
     $$$$$$$$$$$$7$$$$$$$$$.$$$$$$
       $$$$$$$$$$$$$$$$.

configure: Package configured for:
configure: OS type  : linux-gnu
configure: Host CPU : x86_64
configure: build-cpu:vendor:os: x86_64 : pc : linux-gnu :
configure: host-cpu:vendor:os: x86_64 : pc : linux-gnu :
Set the menu options by running the following command:
make menuselect
Use the arrow keys to navigate and the Enter key to select.
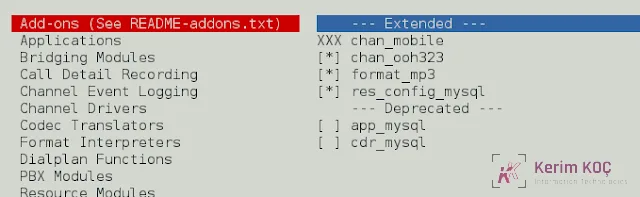
Select Add-ons to enable them.
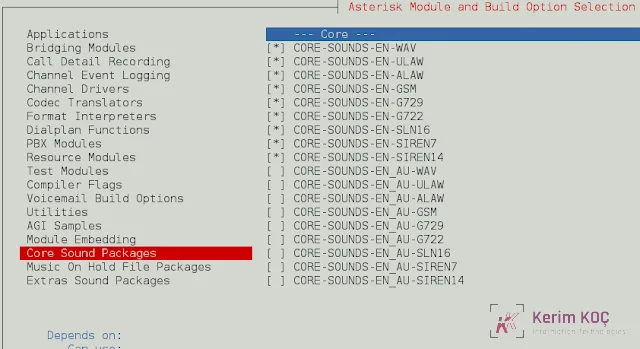
Enable the Core Sound Packages you want to use.
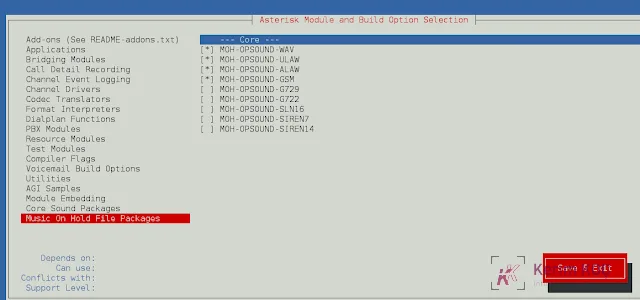
You can also add additional MOH packages that you want to use.
Do the same for Extra Sound Packages.
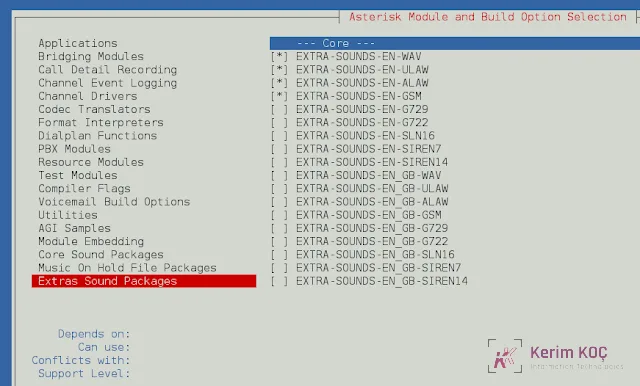
You can also browse the other menus and select the options you consider appropriate for your use case.
When you are done, run the following command to build Asterisk 18 on Ubuntu 20.04|18.04.
makeHere is my successful build output:
.....
TROLEnc.o ooh323cDriver.o -> chan_ooh323.so
   [CC] format_mp3.c -> format_mp3.o
   [CC] mp3/common.c -> mp3/common.o
   [CC] mp3/dct64_i386.c -> mp3/dct64_i386.o
   [CC] mp3/decode_ntom.c -> mp3/decode_ntom.o
   [CC] mp3/layer3.c -> mp3/layer3.o
   [CC] mp3/tabinit.c -> mp3/tabinit.o
   [CC] mp3/interface.c -> mp3/interface.o
   [LD] format_mp3.o mp3/common.o mp3/dct64_i386.o mp3/decode_ntom.o mp3/layer3.o mp3/tabinit.o mp3/interface.o -> format_mp3.so
   [CC] res_config_mysql.c -> res_config_mysql.o
   [LD] res_config_mysql.o -> res_config_mysql.so
Building Documentation For: third-party channels pbx apps codecs formats cdr cel bridges funcs tests main res addons
 +--------- Asterisk Build Complete ---------+
 + Asterisk has successfully been built, and +
 + can be installed by running:              +
 +                                           +
 +                make install               +
 +-------------------------------------------+
The command you will run to install Asterisk 18 on Ubuntu 20.04|18.04 is:
sudo make install
Sample output:
....
make[1]: Entering directory '/home/jkmutai/asterisk-18.1.1/sounds'
make[1]: Leaving directory '/home/jkmutai/asterisk-18.1.1/sounds'
find rest-api -name "*.json" | while read x; do \
	/usr/bin/install -c -m 644 $x "/var/lib/asterisk/rest-api" ; \
done
 +---- Asterisk Installation Complete -------+
 +                                           +
 +    YOU MUST READ THE SECURITY DOCUMENT    +
 +                                           +
 + Asterisk has successfully been installed. +
 + If you would like to install the sample   +
 + configuration files (overwriting any      +
 + existing config files), run:              +
 +                                           +
 + For generic reference documentation:      +
 +    make samples                           +
 +                                           +
 + For a sample basic PBX:                   +
 +    make basic-pbx                         +
 +                                           +
 +                                           +
 +-----------------  or ---------------------+
 +                                           +
 + You can go ahead and install the asterisk +
 + program documentation now or later run:   +
 +                                           +
 +               make progdocs               +
 +                                           +
 + **Note** This requires that you have      +
 + doxygen installed on your local system    +
 +-------------------------------------------+
Optionally, you can install the documentation:
sudo make progdocs
Finally, install the configurations and samples.
sudo make samples
sudo make config
sudo ldconfig
Step 5: Start the Asterisk Service on Ubuntu 20.04|18.04
Create a separate user and group to run the Asterisk services and assign the correct permissions:
sudo groupadd asterisk
sudo useradd -r -d /var/lib/asterisk -g asterisk asterisk
sudo usermod -aG audio,dialout asterisk
sudo chown -R asterisk.asterisk /etc/asterisk
sudo chown -R asterisk.asterisk /var/{lib,log,spool}/asterisk
sudo chown -R asterisk.asterisk /usr/lib/asterisk
Set Asterisk's default user to Asterisk :
$ sudo vim /etc/default/asterisk
AST_USER="asterisk"
AST_GROUP="asterisk"

$ sudo vim /etc/asterisk/asterisk.conf
runuser = asterisk ; The user to run as.
rungroup = asterisk ; The group to run as.
Restart the asterisk service after making the changes:
sudo systemctl restart asterisk
Enable the asterisk service to start at system boot:
sudo systemctl enable asterisk
Check the service status to see whether it is running.
$ systemctl status asterisk
● asterisk.service - LSB: Asterisk PBX
     Loaded: loaded (/etc/init.d/asterisk; generated)
     Active: active (running) since Fri 2020-08-14 12:04:41 CEST; 9s ago
       Docs: man:systemd-sysv-generator(8)
      Tasks: 82 (limit: 4567)
     Memory: 44.6M
     CGroup: /system.slice/asterisk.service
             └─54142 /usr/sbin/asterisk -U asterisk -G asterisk
Verify that you can connect to the Asterisk command-line interface.
$ sudo asterisk -rvv
 Asterisk 18.1.1, Copyright (C) 1999 - 2018, Digium, Inc. and others.
 Created by Mark Spencer markster@digium.com
 Asterisk comes with ABSOLUTELY NO WARRANTY; type 'core show warranty' for details.
 This is free software, with components licensed under the GNU General Public
 License version 2 and other licenses; you are welcome to redistribute it under
 certain conditions. Type 'core show license' for details.
 Running as user 'asterisk'
 Running under group 'asterisk'
 Connected to Asterisk 18.1.1 currently running on asterisk (pid = 107650)
 asterisk*CLI>
If you have an active ufw firewall, open the http ports and ports 5060,5061:
sudo ufw allow proto tcp from any to any port 5060,5061
You now have Asterisk 18 installed and running on your Ubuntu 20.04|18.04 Linux server.


