Kerim Koç

Contents
A powerful IT asset manager is needed to track the ownership, deployment process and details of all servers. This can be achieved by installing and using Snipe-IT, an open-source IT asset management tool.
In this article, we will discuss installing Snipe-IT on an Ubuntu 22.04 server.
Installing Snipe-IT Asset Manager
To install the Snipe-IT tool, you first need to install the LAMP stack, that is, Linux, the Apache server, the MySQL server and PHP. To install them, first update the server's repository, then review the given commands and run them on your server as well.
sudo apt update && sudo apt upgrade -yInstall Apache
Install the Apache server by running the command as follows:
sudo apt install apache2 -yNow, start and enable the Apache service by running commands similar to those shown below.
sudo systemctl start apache2
sudo systemctl enable apache2
Install PHP
To install PHP, first add the PHP repository to your server with the following command:
sudo add-apt-repository ppa:ondrej/phpNext, install the PHP extensions. To do this, run the command as follows:
sudo apt install -y php-{opcache,pdo,bcmath,calendar,ctype,fileinfo,ftp,gd,intl,json,ldap,mbstring,mysqli,posix,readline,sockets,bz2,tokenizer,zip,curl,iconv,phar}Also, install the other required packages.
sudo apt install -y openssl curl git wget zipThen, the Apache web server needs to be restarted so that the new changes can be applied.
sudo systemctl restart apache2Install the MySQL/MariaDB server
Install a MySQL or MariaDB server. In our case, we are installing a MySQL server. Then, start and enable the MySQL server by running the commands as shown below.
sudo apt install mysql-server
sudo systemctl start mysql
sudo systemctl enable mysql
Next, secure the MySQL server. To do this, you need to run the command as follows:
sudo mysql_secure_installationSet the root password and clear the privileges. You will see output similar to the screenshot below.
Create a database for Snipe-IT
Log in to the MySQL server and create a user and a database for Snipe-IT. For more details, run the commands as follows.
sudo mysql -u root -p

mysql> CREATE DATABASE snipeit_db;

Query OK, 1 row affected (0.01 sec)

mysql> CREATE USER 'snipeit'@'localhost' IDENTIFIED WITH mysql_native_password BY '[email protected]';

Query OK, 0 rows affected (0.03 sec)

mysql> GRANT ALL PRIVILEGES ON snipeit_db.* TO 'snipeit'@'localhost';

Query OK, 0 rows affected (0.02 sec)

mysql> FLUSH PRIVILEGES;

Query OK, 0 rows affected (0.00 sec)

mysql> quit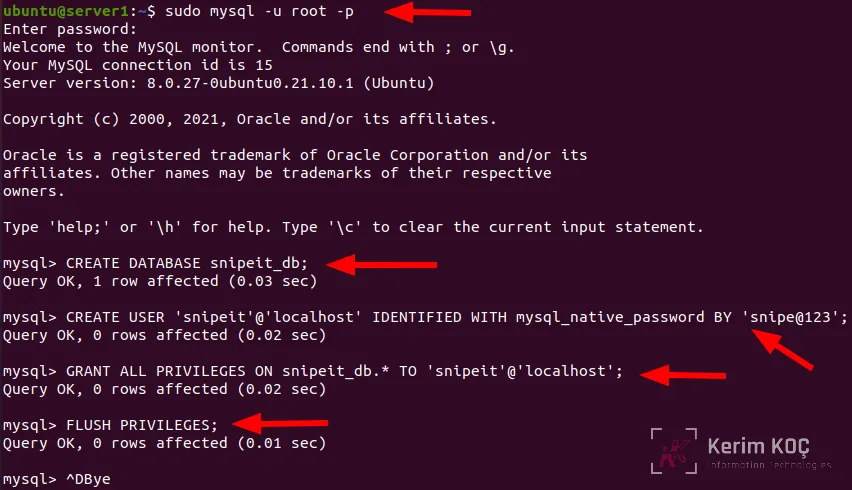
Install Snipe-IT
To install the Snipe-IT tool on the Ubuntu 22.04 server, download the latest Snipe-IT package from GitHub. Go to the /var/www/html directory and download the package by running a command similar to the following:
cd /var/www/htmlRun the git command to download the package into this directory.
sudo git clone https://github.com/snipe/snipe-it snipe-itNext, copy the .env.example file by creating the new file as .env.
cd /var/www/html/snipe-itsudo cp .env.example .envThen, edit this .env file by updating the database details and the URL. For more details, check the screenshot shown below.
sudo nano .envAPP_URL=snipeit-test.com
APP_TIMEZONE='UTC'
DB_CONNECTION=mysql
DB_HOST=127.0.0.1
DB_DATABASE=snipeit_db
DB_USERNAME=snipeit
[email protected]
DB_PREFIX=null
DB_DUMP_PATH='/usr/bin'
DB_CHARSET=utf8mb4
DB_COLLATION=utf8mb4_unicode_ci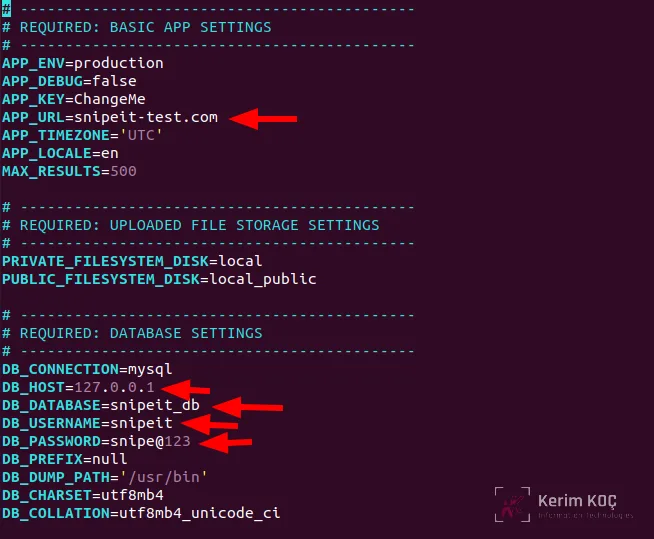
Install Composer
Install Composer in this directory. To download and install Composer, you can run a command similar to the one shown below.
curl -sS https://getcomposer.org/installer | php

sudo mv composer.phar /usr/local/bin/composer
Next, go to /var/www/html/snipe-it, then run the command as follows to download all the PHP dependencies:
cd /var/www/html/snipe-it/

sudo composer update --no-plugins --no-scripts

sudo composer install --no-dev --prefer-source --no-plugins --no-scripts
Then, generate the application key by running the command as shown below.
sudo php artisan key:generateNext, grant the required permissions to your snipe-it directory
sudo chown -R www-data:www-data /var/www/html/snipe-it

sudo chmod -R 755 /var/www/html/snipe-it
Configure the Apache web server for Snipe-IT
Create an Apache configuration file for Snipe-IT. Before that, however, you can disable Apache's default configuration file with a similar command as shown below.
sudo a2dissite 000-default.confNext, create a configuration file for Snipe-IT with contents similar to the given screenshot.
sudo nano /etc/apache2/sites-available/snipeit.confVirtual host file contents:
<VirtualHost *:80>
  ServerName snipeit-test.com
  DocumentRoot /var/www/html/snipe-it/public
  <Directory /var/www/html/snipe-it/public>
    Options Indexes FollowSymLinks MultiViews
    AllowOverride All
    Order allow,deny
    allow from all
  </Directory>
</VirtualHost>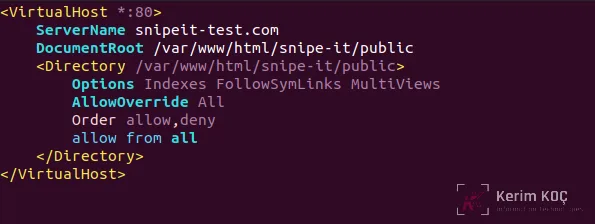
Then, you need to enable the new configuration file and restart the Apache server for the changes to take effect.
sudo a2ensite snipeit.conf
sudo systemctl restart apache2
Snipe-IT Dashboard
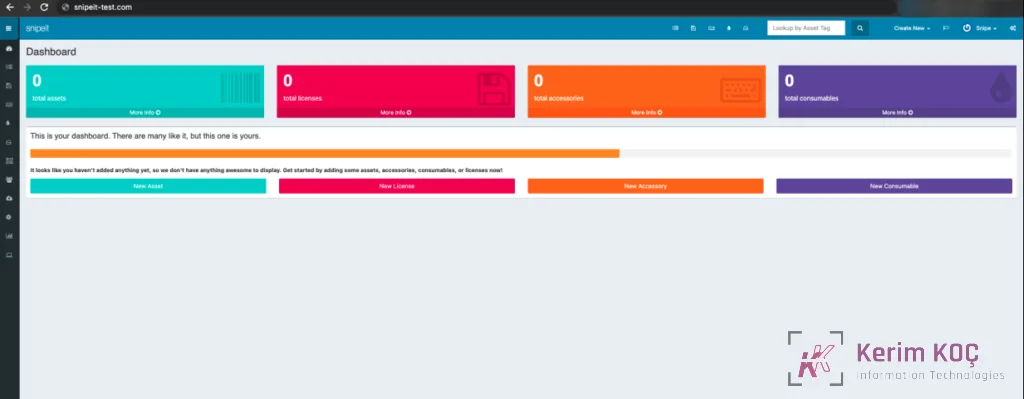
Finally, you are ready to see the Snipe-IT dashboard by accessing it through the domain name you set. First, the page will be displayed with the details of the requirements, and then you can create a user. For more details, check the screenshot below.
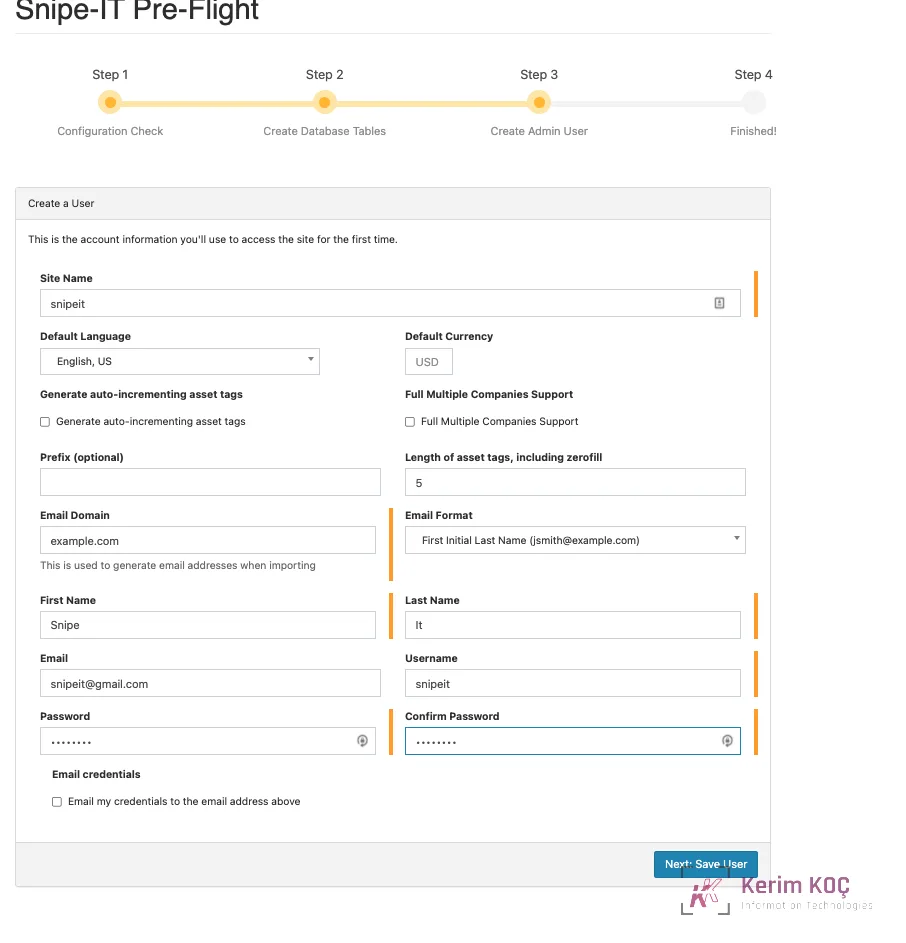
Then, save the user details and click Next; you will see the Snipe-IT dashboard similar to the screenshot shown below.