Kerim Koç
VMware vSphere is the pioneer of the virtualization world. No other virtualization software is as feature-rich as VMware vSphere. More than 500,000 enterprise data centers now use VMware vSphere. A large part of the data center is expected to be converted to virtualization in the near future. Because VMware vSphere offers more features than any other virtualization software, demand for VMware vSphere is expected to keep growing day by day. VMware ESXi is the foundation of VMware vSphere, and the current release version of VMware vSphere is ESXi 7.0. So in this article I will walk through the installation of the VMware ESXi 7.0 hypervisor step by step with screenshots. We will also see how to configure the management network so that you can reach the VMware ESXi host from the VMware web console.
Hardware Requirements for VMware ESXi 7.0
VMware ESXi requires system planning before installation. So think about your data center and arrange the server hardware according to your needs. Here I only cover the minimum requirements for installing the VMware ESXi 7.0 hypervisor. To start the VMware ESXi 7.0 installation, the hardware and system resources must meet the following requirements.
- A supported server platform. To check your server platform, see the VMware Compatibility Guide .
- The host must have at least two CPU cores.
- ESXi 7.0 supports 64-bit x86 processors released after September 2006. This includes a wide range of multi-core processors.
- The NX/XD bit must be enabled for the CPU in the BIOS.
- A minimum of 4 GB of physical RAM. It is recommended to provide at least 8 GB of RAM to run virtual machines properly.
- To support 64-bit virtual machines, hardware virtualization (Intel VT-x or AMD RVI) must be enabled on x64 CPUs.
- One or more Gigabit or faster Ethernet controllers. For a list of supported network adapter models, see the VMware Compatibility Guide .
- A SCSI disk or a local, non-network RAID LUN with unpartitioned space for the virtual machines.
- ESXi 7.0 requires a boot disk of at least 8 GB for USB or SD devices and 32 GB for other device types such as HDD, SSD or NVMe. A boot device must not be shared between ESXi hosts.
- For Serial ATA (SATA), a disk connected through supported SAS controllers or supported on-board SATA controllers. SATA disks are considered remote, not local. Because they are seen as remote, these disks are not used as a scratch partition by default.
If we meet the minimum requirements above, we are ready to install VMware ESXi 7.0. In the following section we will see how to install VMware ESXi 7.0 step by step with screenshots.
Step-by-Step VMware ESXi 7.0 Installation with Screenshots
Now we are going to install VMware ESXi 7.0. We can easily install VMware ESXi by following these three steps:
- Download the VMware ESXi Hypervisor or VMvisor ISO and create a bootable drive
- Run the VMware ESXi installation process
- Configure the VMware ESXi Management Network
Step 1: Download the VMware ESXi VMvisor ISO and Make a Bootable Drive
Before starting the VMware ESXi installation, we need to get the VMware VMvisor ISO file from the VMware download page and then burn this ISO to a bootable CD/DVD. The steps below show how to download the VMvisor ISO file and how to burn the ISO file to a bootable CD/DVD.
- Go to the official VMware website [vmware.com], click the Downloads menu item and then click the vSphere option. To download any product from VMware you need to register or sign in to VMware. So if you do not have an account with VMware, create one now. VMware only allows software downloads for licensed users. So if you do not buy a license, register for the VMware ESXi trial download (60 days only) and then download the VMware VMvisor ISO file. Alternatively, you can look for a VMware ESXi license on eBay and, if you are lucky, buy a license there at a low price, and after purchasing the license download the VMvisor ISO file from the link provided there.
- After downloading the ISO file, burn the ISO image to a CD or DVD with your favorite burning software such as Nero [nero.com] or Power ISO [poweriso.com], and then insert the burned CD/DVD into the CD/DVD ROM of the physical server.
Step 2: Run the VMware ESXi Installation Process
After inserting the CD/DVD into the server's DVD ROM, we will now start the VMware ESXi 7.0 installation. So press the power button of the server machine and go to the boot options menu according to the server machine vendor. Choose to boot from the CD/DVD ROM; the system will start booting from the CD/DVD and the VMware ESXi installer will begin to load.
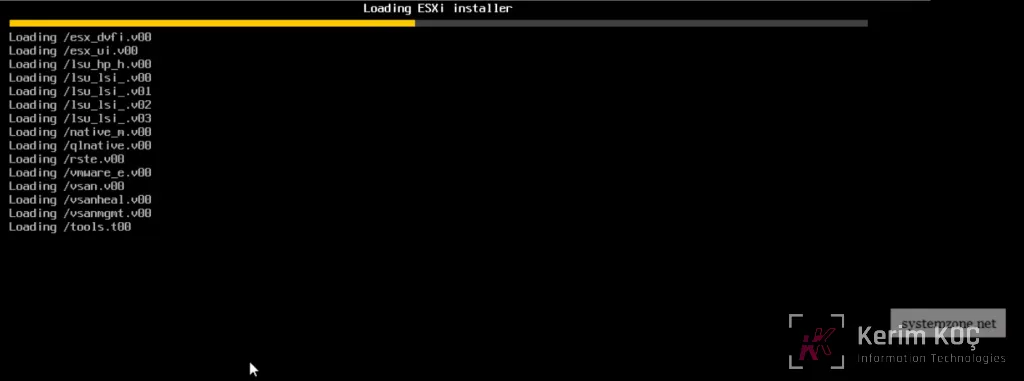
Loading the VMware 7.0 Installer
After all modules are loaded successfully, the ESXi installer will ask you to start the installation process. There is nothing for us to do in this window. Just press Enter to start the ESXi installation.
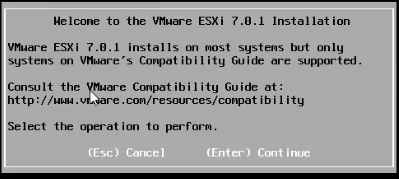
VMware 7.0 Installation Welcome Screen
After you press Enter, the ESXi installer will ask you to accept the VMware End User License Agreement. We cannot start the installation without accepting the license agreement. Press F11 to accept the license agreement and continue the installation process.
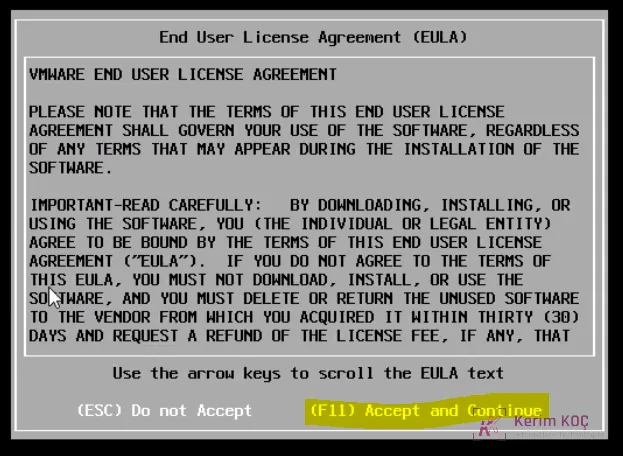
Accepting the VMware vSphere License Agreement
After you accept the VMware end user license agreement, the ESXi installer will start scanning for the available storage devices (HDDs) attached to the host server. This process may take some time depending on the attached storage devices.
After scanning the storage devices, the ESXi installer will list the available storage devices. Here we will find two types of storage devices – Local and Remote. Local storage devices are those attached directly to the host, such as the host's own HDD. Remote storage devices are LUN HDDs connected from array devices such as a DELL EMC storage array.
In addition to listing the available storage devices, the ESXi installer will ask you to select a storage device (HDD) on which ESXi will be installed. So select the HDD on which you want to install VMware ESXi from the list, and then press Enter to go to the next step.
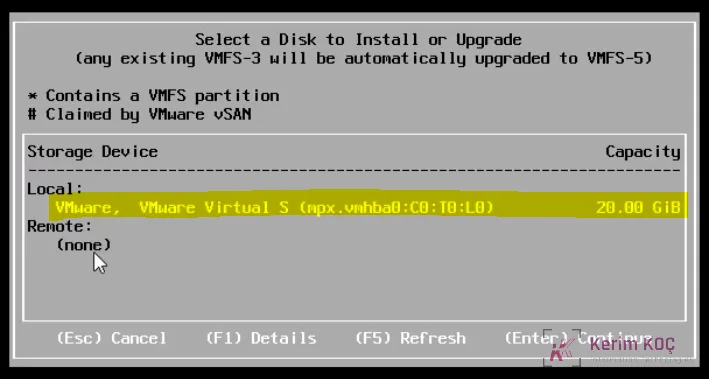
Selecting the HDD from the Storage Device List
After selecting the HDD for the ESXi installation and pressing Enter, the ESXi installer will ask you to choose the keyboard layout to be used for input from your keyboard. By default, the ESXi installer will select the US default keyboard layout. It is better to keep the default, but you can change the keyboard layout as you like. After selecting the keyboard layout, press Enter to go to the next step.
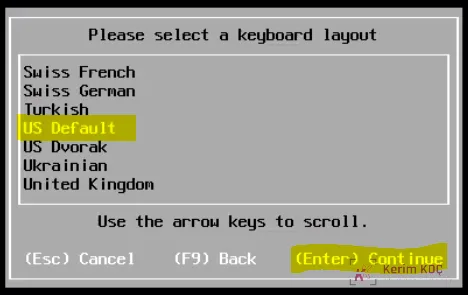
Selecting the Keyboard Layout
Now the ESXi installer will ask you to set a root password. Enter the root password carefully and confirm it. Never forget the root password until you change it to a new one. The password must be at least 7 characters long. After entering the root password, press Enter to go to the next step.
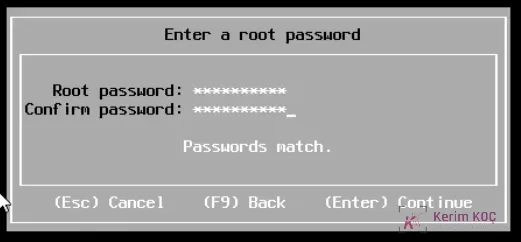
Providing the ESXi root password
After you provide the root password, the ESXi installer will collect some additional system information, which may take a few minutes, and then ask you to confirm the installation, because it will format and repartition the selected disk space and the old data can never be recovered. Press F11 to confirm the ESXi installation.
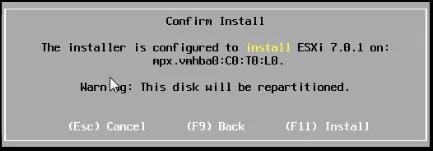
Confirming the VMware vSphere 7.0 Installation
After you confirm the installation, the ESXi installation will start and we can see the installation progress on the screen. VMware ESXi is a very lightweight operating system. So installing the ESXi OS on the host will take only a few minutes.

VMware ESXi 7.0 Installation Progress
The VMware ESXi installation will complete in a few minutes and a success message will be shown. It will also ask you to reboot the server to start using VMware ESXi. But before rebooting the server, make sure the installation media (CD/DVD) has been removed. Press Enter to reboot the server.
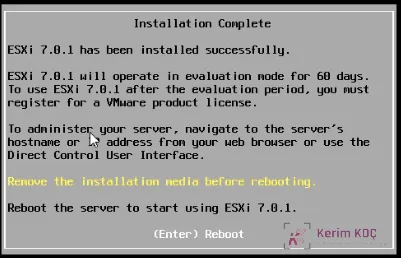
VMware ESXi 7.0 Installation Successful Message
The host server will shut down and reboot, and these operations will complete quickly. After the reboot, VMware ESXi will start loading, and once all the ESXi modules are loaded, the home screen of VMware ESXi will be displayed.
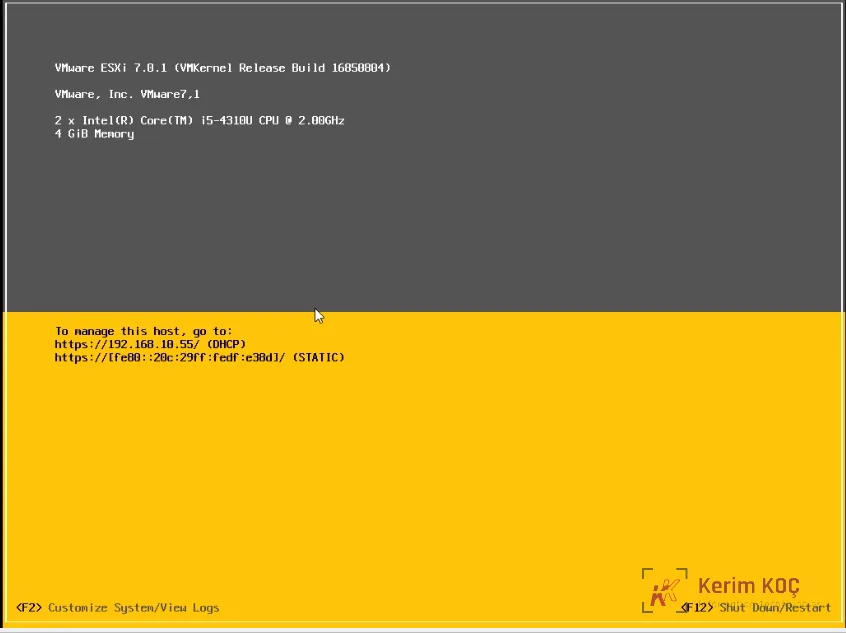
VMware ESXi 7.0 Home Screen
If the server network adapter is connected to a DHCP server, an IP will be assigned dynamically on the Management Network, and the IP will be shown on the ESXi home screen. We can see in the home screen above that an IP was assigned dynamically.
If we do not want to keep this dynamically assigned IP address, we can also assign the management IP address statically. In the next step we will see how to assign a static management IP address, as well as DNS and the hostname, from the home screen.
Step 3: Configure the VMware ESXi 7.0 Management Network
After the VMware ESXi 7.0 installation, the first post-installation task is to assign a static IP address on the management network. Although the management IP can be assigned dynamically, most network administrators do not like to assign the IP address on the ESXi management network dynamically. Now we will see how to configure the management network from the VMware ESXi home screen.
On the ESXi home screen shown in the image above, press F2 for Customize System/View Logs. Enter the root password given during the installation process in the window that opens, and then press Enter. The System Customization menu will now appear.
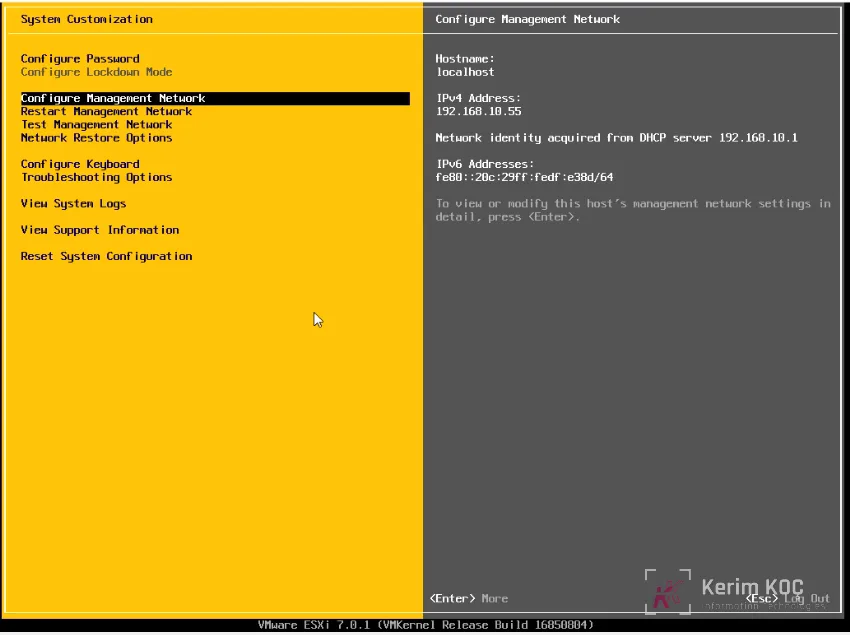
VMware 7.0 System Customization Console
From the System Customization menu, select Configure Management Network and then press Enter. The Configure Management Network menu will appear.
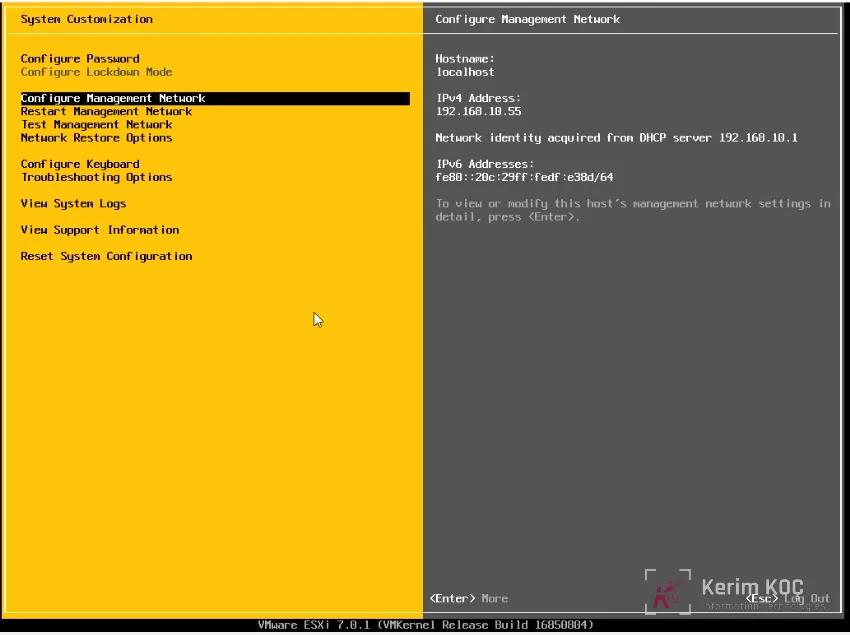
VMware 7.0 System Customization Console
From the Configure Management Network menu, select the IPv4 Configuration menu item and press Enter. The IPv4 Configuration window will appear.
In the IPv4 Configuration window, use the Up and Down keys to select the Set static IPv4 address and network configuration option, and then press the Space key to select it.
Now set your preferred IPv4 Address, Subnet Mask and Default Gateway statically, and then press Enter.
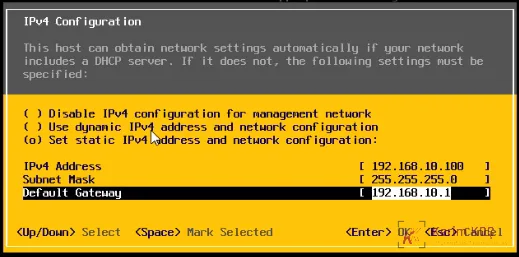
VMware ESXi 7.0 Static IP Configuration
To configure DNS and the hostname, select the DNS Configuration menu item from the Configure Management Network menu and then press Enter. The DNS Configuration window will appear.
In the DNS Configuration window, use the Up and Down keys to select the Use the following DNS server addresses and hostname option, and then press the Space key to select it.
Now provide the Primary DNS Server, the Alternate DNS Server address and the Hostname, and then press Enter.
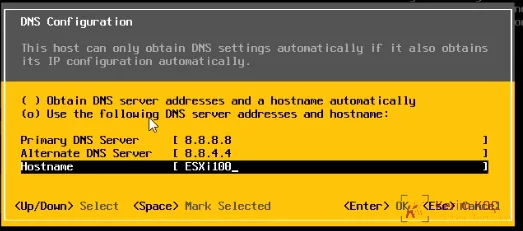
VMware ESXi 7.0 Hostname and DNS IP Assignment
Now press Esc to return from Configure Management Network. It will now ask you to confirm applying the management network changes. Press Y to apply the changes and restart the management network.
After applying the changes, the Configure Management Network menu will return to the System Customization menu. From the System Customization menu, press Esc to exit System Customization and return to the ESXi home screen.
Now go to any PC from which the ESXi management IP address is reachable and open any web browser. I personally recommend using Google Chrome because it is very easy and comfortable. However, you can use any browser you prefer.
Type the URL shown on the ESXi home screen (example: https://ESXi_IP_address) into the browser's URL bar and press Enter. Because ESXi uses a self-signed SSL certificate, the browser may not trust this certificate and will show a warning message that the certificate is not trusted. In this case, click the Advanced button shown on the page that opens, and then click the link that says Proceed to ESXi_IP_address (unsafe). Now you will find the VMware ESXi login page as in the image below.
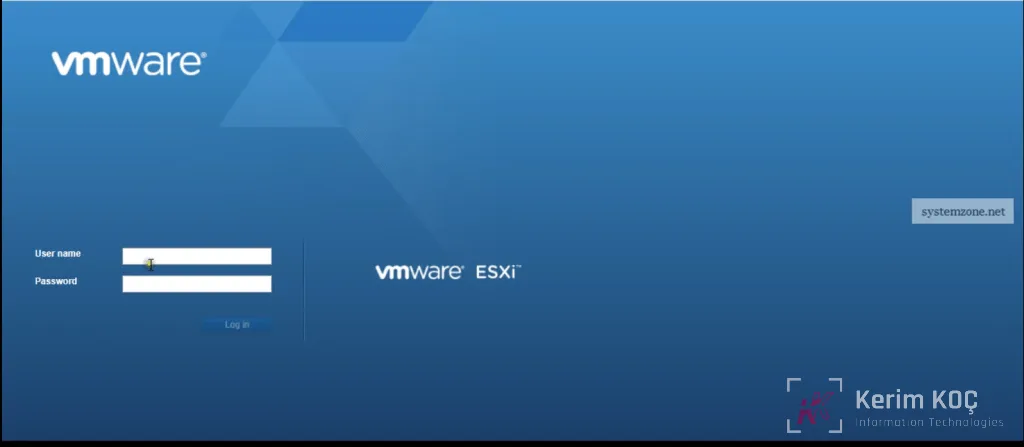
VMware ESXi Web Login Page
On the login page, enter the username root and the root password in the Password field, and then press Enter or click the Log in button. Now you will find the VMware ESXi web management page, from which we can manage everything to run a smooth data center with VMware ESXi.