Kerim Koç

Contents
First of all, the DNS server is extremely important, because without it you could not find any website. It is a globally distributed service organized hierarchically, where each part represents a subdomain.
Let's dive into this blog article about installing and configuring a Windows DNS Server on Windows 2022.
What is a DNS Server?
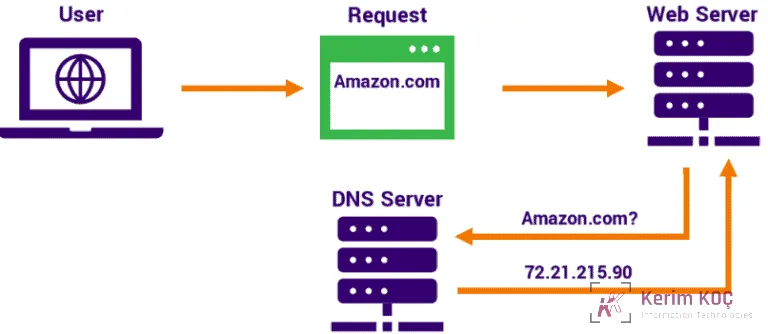
DNS servers are quite similar to phone books and are an essential part of the Internet. What DNS servers do is help translate website names into IP addresses so that machines can understand the query and load the requested pages for users. This makes it easier and faster for users to access them online.
Put simply, the Domain Name System (DNS) is a naming database that stores information about domain names and their corresponding IP addresses. It also translates human-readable domain names into the corresponding IP addresses (IPv4 or IPv6), which are not easy for people to remember and type.
When someone types a domain name such as "www.google.com" into the browser, a request for the corresponding IP address (usually an IPv4 address) is sent to the DNS server. The DNS server then checks its database for the requested domain name, finds it, and sends the corresponding IP address back to the browser , which in turn uses this information to connect to the website.
A DNS server is a type of name server that answers queries from other computers, such as web browsers and email clients . It is an organized, hierarchical naming system for computers, services, or any resource connected to the Internet or a private network; it associates various pieces of information with the domain names assigned to each of the participating entities.
There are different types of DNS servers, including the recursive server , the root name server, the TLD server and the authoritative name server .
How Does a DNS Server Work?
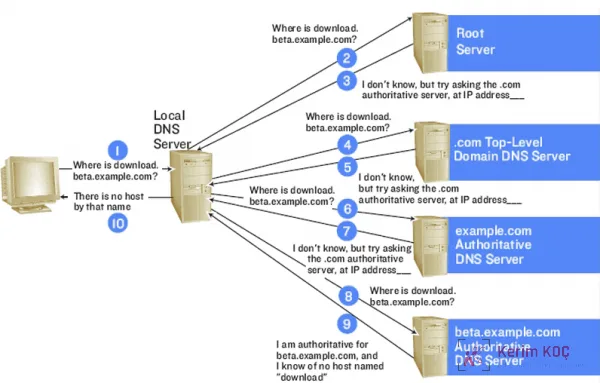
Essentially, DNS converts the domain name into IP addresses that computers can read, understand and use. The moment a user types a query or domain into a browser, the DNS service converts what the user typed into Internet Protocol (IP) addresses that the machine can understand.
In turn, the machine finds and serves the requested web page. This whole process of translating and discovering the requested data is called DNS resolution .
The DNS Resolution Process
The following are the steps involved in the DNS resolution process:
- The user types the query or domain name into the browser.
- The browser sends a recursive DNS query or message into the network to find the corresponding IP address.
- The query is then forwarded to a recursive DNS server managed by the ISP. After the recursive DNS server obtains the address, it looks up the page and loads it for the user.
- If the recursive DNS server cannot find the correct answer to the user's query, it will query other servers. It will first check the DNS root name servers, then the top-level domain (TLD) name servers, and finally the authoritative name servers .
- These servers work together and redirect until they obtain a DNS record that contains the correct answer for the requested query.
- The recursive server also caches the information for the future. This allows it to respond directly the next time a similar request occurs, instead of querying a series of other servers.
- If the authoritative name servers cannot find the information either, an error message is sent to the user.
A domain name server (DNS) performs this entire process within seconds. In conclusion, the DNS protocol is the set of rules used to query and update these servers, which defines how the Internet's Domain Name System (DNS) works.
A simple way of looking at the process is that it uses a recursive server that translates domain names into Internet Protocol (IP) addresses and does the asking on behalf of the user.
Now it is time to learn the steps for installing and configuring a Windows DNS Server on Windows 2022.
Installing and Configuring a Windows DNS Server on Windows 2022
Prerequisites
- A user with administrator privileges.
- A minimum of 4 GB RAM with a 2-core CPU.
Install the DNS Server
To install the DNS server on Windows Server 2022, log in to Windows Server as an administrator user and follow the steps given below.
Step 1 – Open Server Manager as shown below.
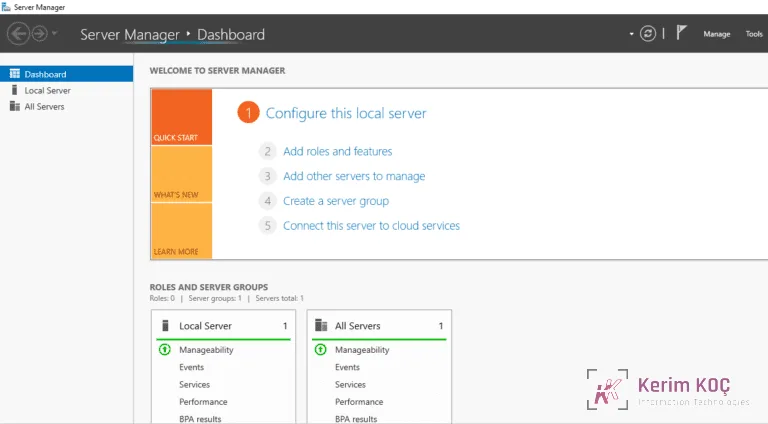
Step 2 – Add roles and features Click the option . You should see the Before you begin screen.
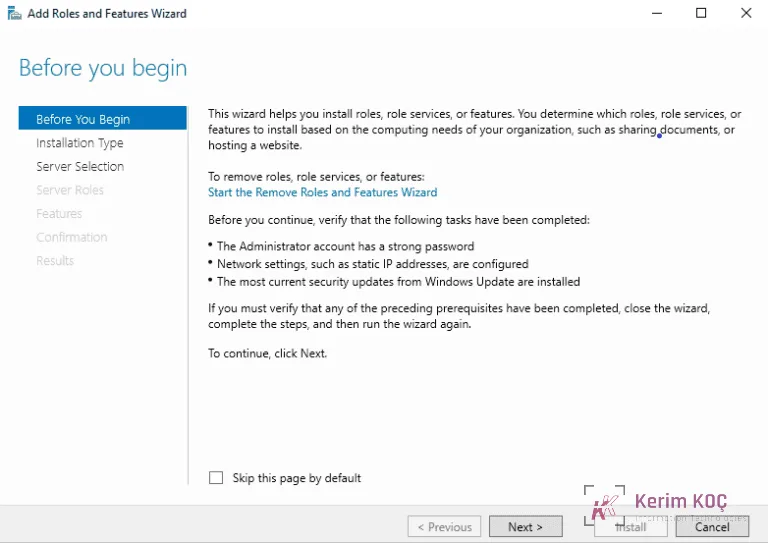
Step 3 – Click the Next button . You should see the Select installation type screen.
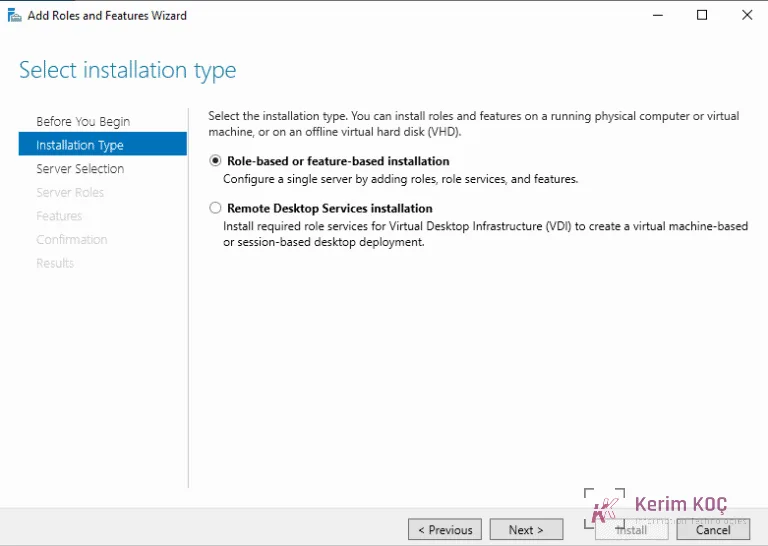
Step 4 – Select Role-based or feature-based installation and click the Next button . You should see the Select destination server screen.
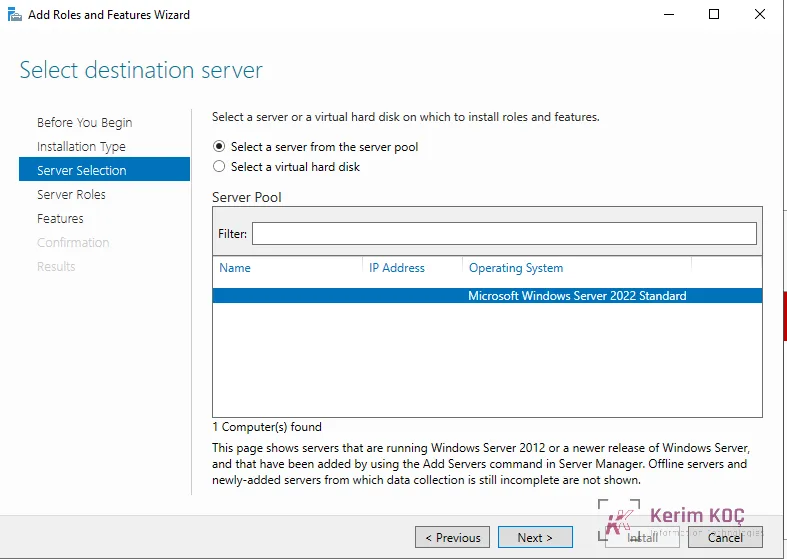
Step 5 – Select the server from the server pool and click the Next button . You should see the Select server roles screen.
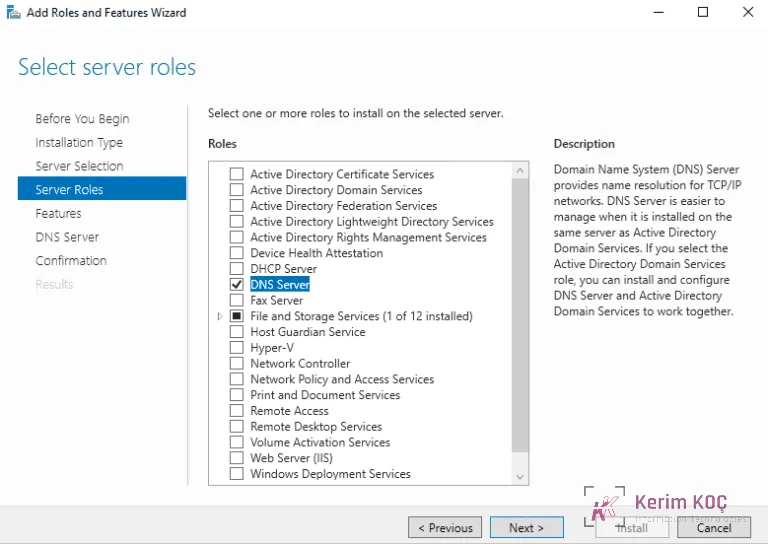
Step 6 – Select DNS Server and click the Next button . You should see the Confirm installation selections screen.
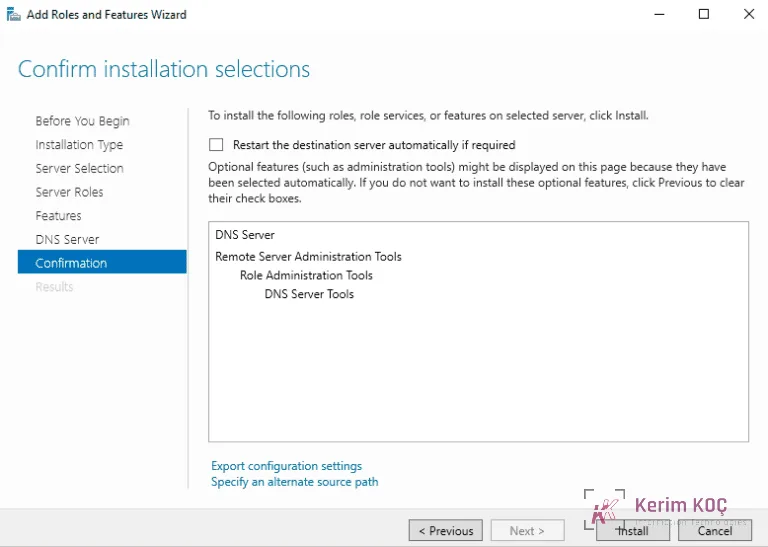
Step 7 – Verify all the settings and click the Install button to start the installation . You should see the installation progress screen.
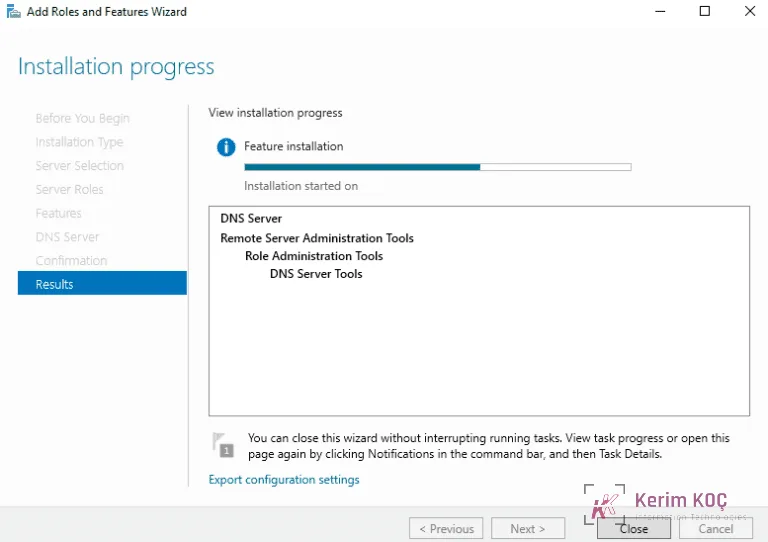
Step 8 – Wait for a while for the installation to complete. After the installation is complete, click the Close button to close the installation wizard.
Creating a Forward Lookup Zone
Next, you will need to create a forward lookup zone to resolve a name to an IP address. Follow the steps below to create a forward lookup zone:
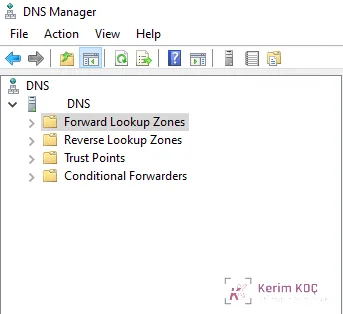
Step 1 – In Server Manager, click Tools => DNS to open the DNS manager as shown below.
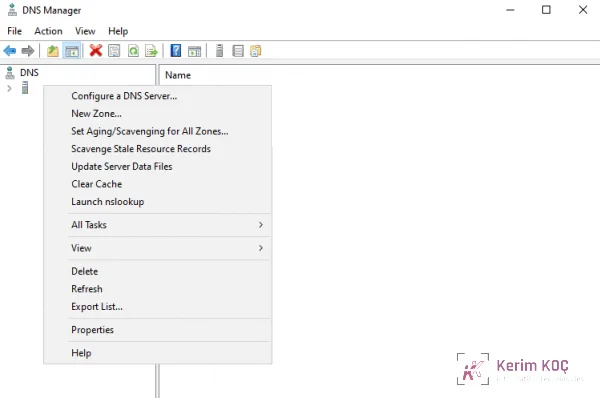
Step 2 – Right-click the server name. You should see the following options.
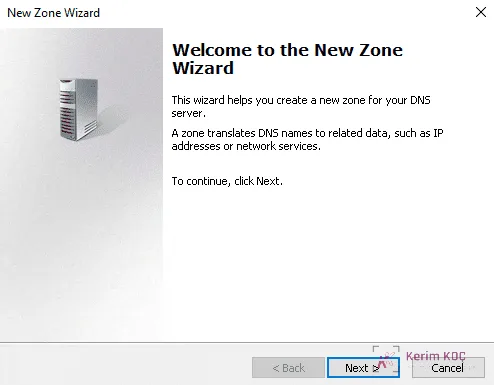
Step 3 – Click New Zone . You should see the zone configuration wizard screen.
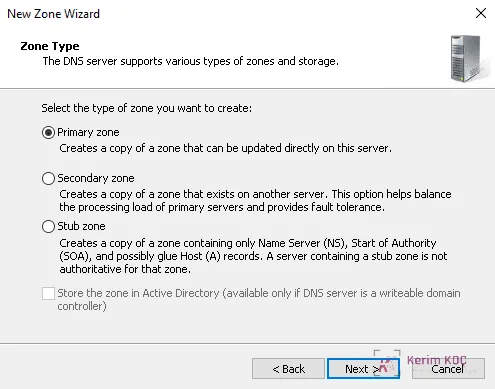
Step 4 – Click the Next button . You should see the zone type selection screen.
Step 5 – Select Primary zone and click the Next button . You should see the following screen.
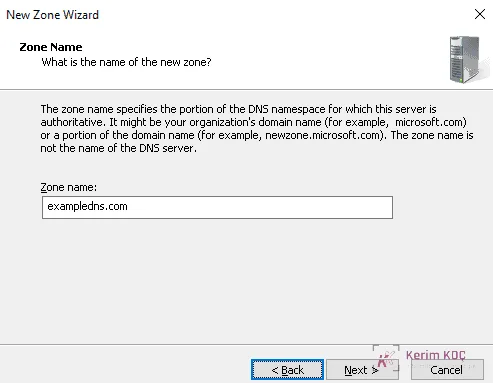
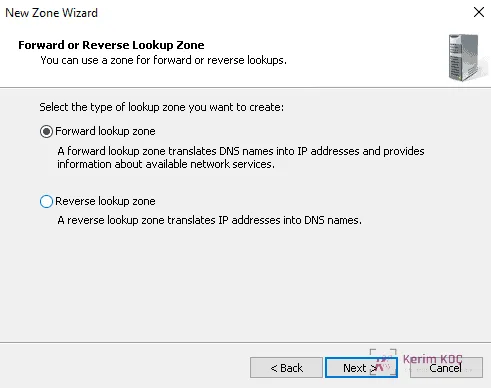
Step 6 – Select Forward lookup zone and click the Next button . You should see the following screen.
Step 7 – Enter your zone name and click the Next button. You should see the following screen.
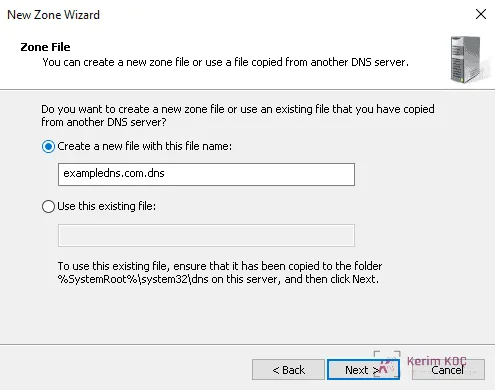
Step 8 – Select the "Create a new file with this file name" option and click the Next button . You should see the Dynamic Update screen.
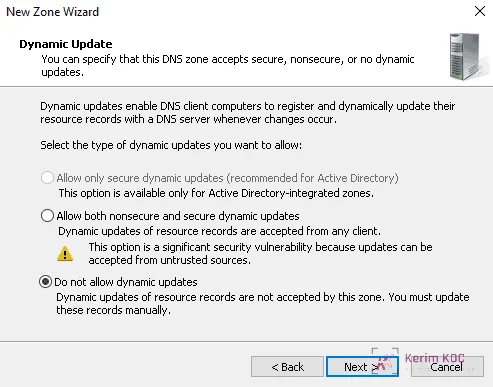
Step 9 – Select the "Do not allow dynamic updates" option and click the Next button . You should see the following screen:
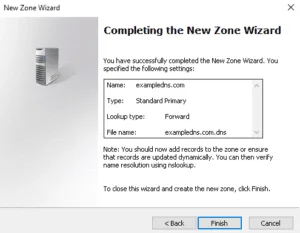
Step 10 – Click the Finish button . You should see your forward lookup zone on the following screen:
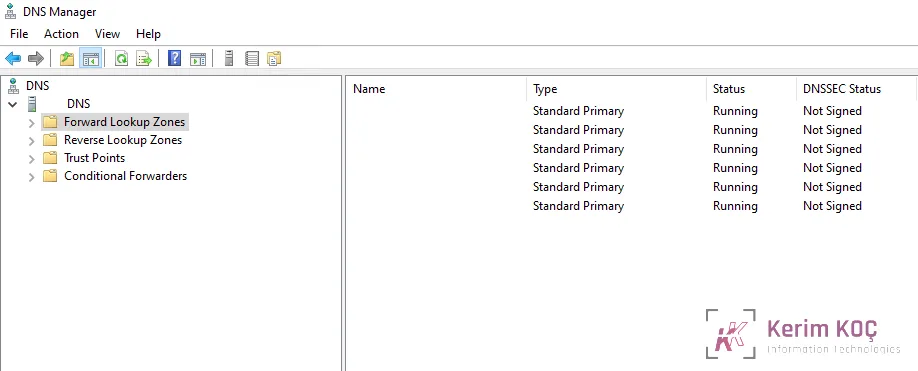
Creating a Reverse Lookup Zone
The following steps are for creating a reverse lookup zone to resolve an IP address to a name. Follow the steps below to create a reverse lookup zone:
Step 1 – In the DNS manager, right-click the server name and click New Zone. You should see the zone creation wizard.
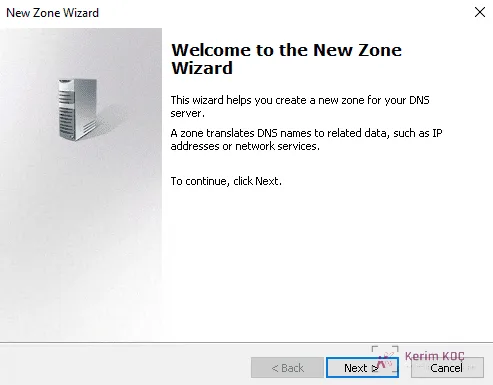
Step 2 – Click the Next button . You should see the zone type selection screen.
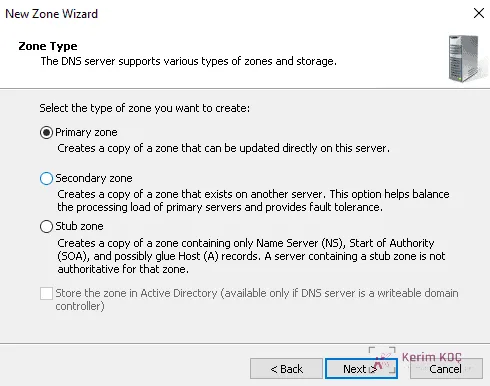
Step 3 – Select Primary zone and click the Next button . You should see the following screen.
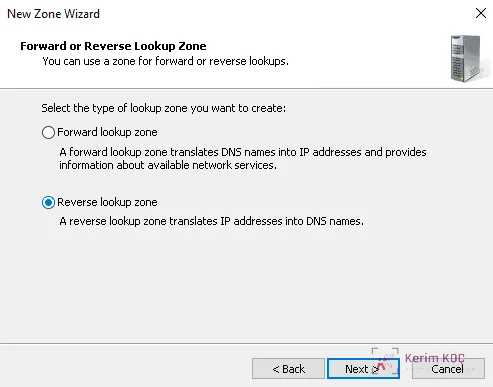
Step 4 – Select "Reverse lookup zone" and click the Next button . You should see the following screen.
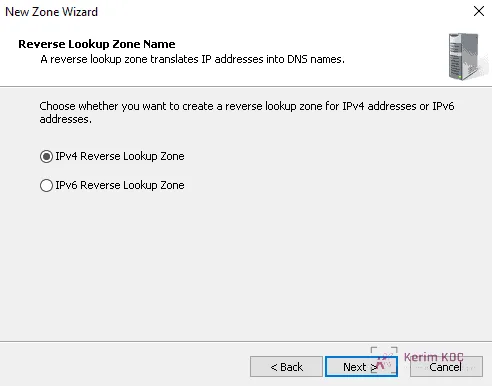
Step 5 – Select IPv4 Reverse Lookup Zone and click the Next button . You should see the following screen.
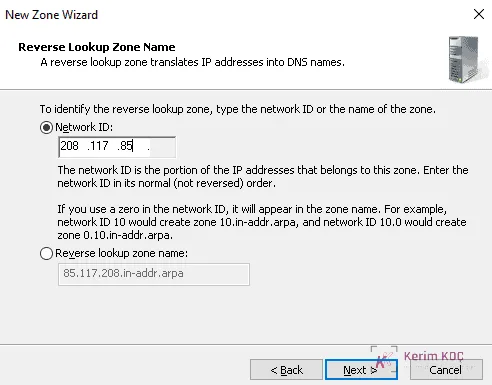
Step 6 – Define your network ID and click the Next button. You should see the following screen.
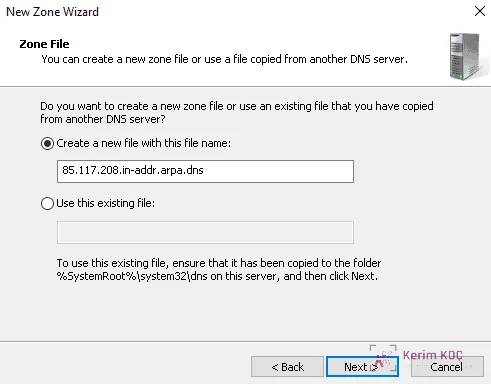
Step 7 – Select the "Create a new file with this file name" option and click the Next button . You should see the Dynamic Update screen.
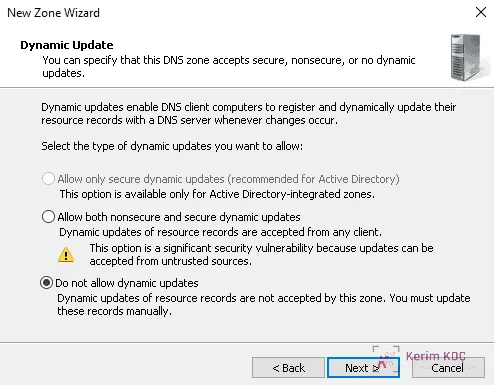
Step 8 – Select the "Do not allow dynamic updates" option and click the Next button . You should see the following screen.
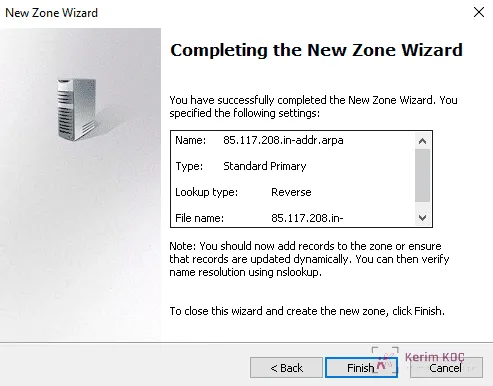
Step 9 – Click the Finish button . You should see your reverse lookup zone on the following screen.
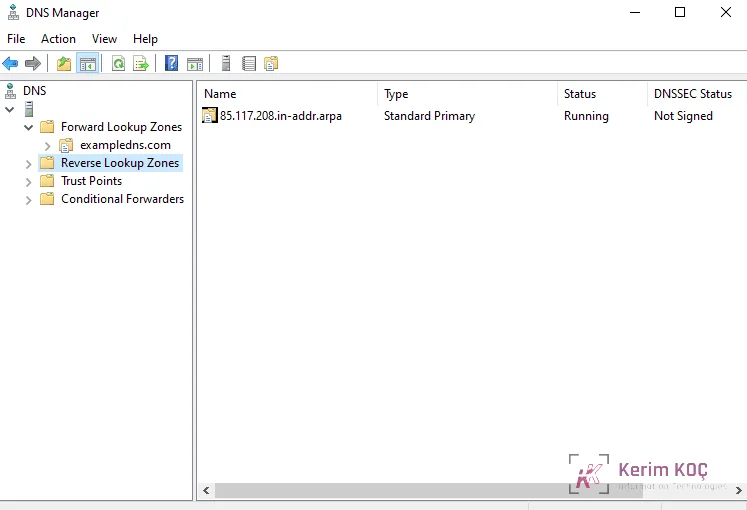
Adding A and PTR Records to DNS
You will also need to add A and PTR records for the remote hosts in order to perform name resolution. Follow the steps below to add A and PTR records to DNS:
Step 1 – In the DNS manager, right-click the forward lookup zone. You should see the following screen.
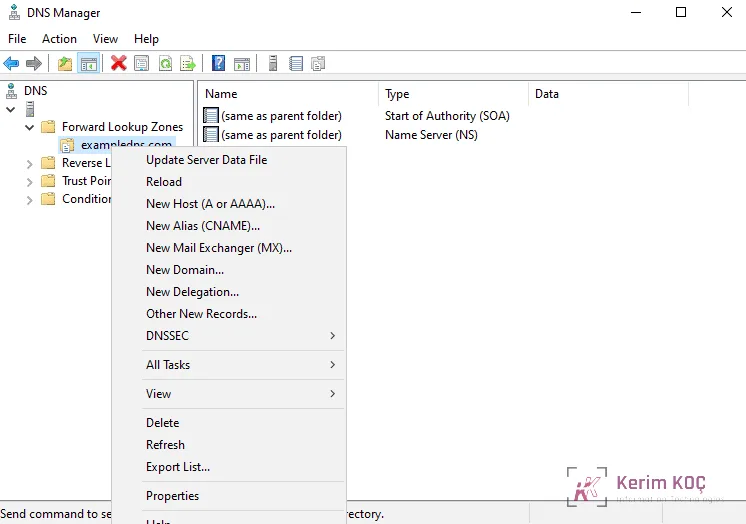
Step 2 – Click New Host (A or AAAA) . You should see the following screen.
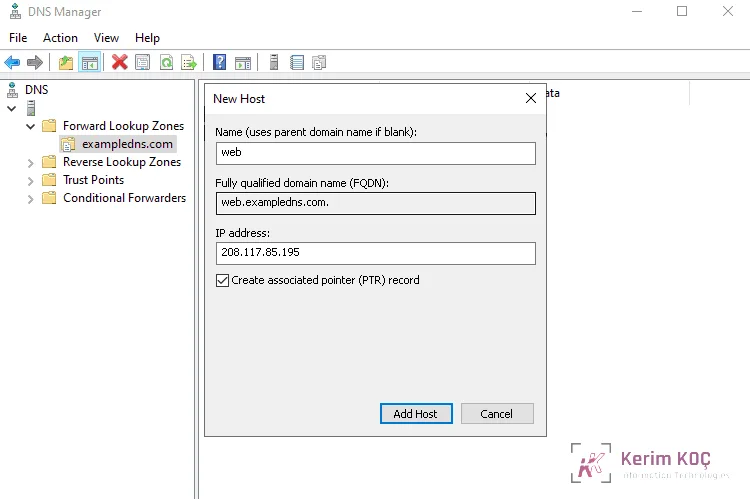
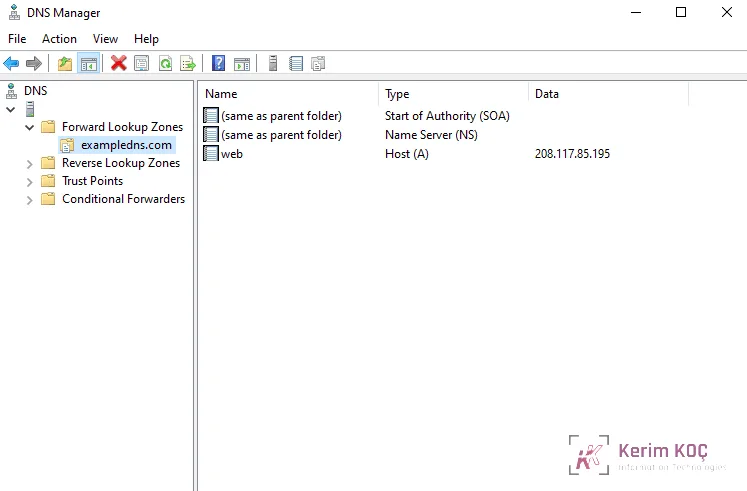
Step 3 – Enter the main domain name and IP address of your host, then select "Create associated pointer (PTR) record" and click the Add Host button . Then click the forward lookup zone, and you should see the A record you added on the following screen.
Verify DNS Name Resolution
At this point, the DNS server installation and configuration is complete. Now we need to test whether DNS name resolution is working.
Open your command-line interface and run the nslookup command.
nslookupYou should see the following output:
Default Server:  web.exampledns.com
Address:  208.117.85.195
Now type the FQDN of the host you added.
> web.exampledns.comIn the following output you should see the IP address that the name resolves to.
Server:  web.exampledns.com
Address:  208.117.85.195

Name:    web.exampledns.com
Address:  208.117.85.195
Next, type the IP address of the host you added.
> 208.117.85.195In the following output you should see the name that the IP address resolves to.
Server:  web.exampledns.com
Address:  208.117.85.195

Name:    web.exampledns.com
Address:  208.117.85.195
Thank you for reading this article about installing and configuring a Windows DNS Server on Windows 2022.